
Free Airdrop Season 7 is LIVE! Answer fun questions or do simple tasks to earn rewards from the $30K BitDegree prize pool. Participate Now ! 🔥
There are multiple crypto wallets in the market today, however, to find out which one of the best for your needs, you should find out more about each of them.
In this GateHub review, I will take a look at the company's background, wallet's features and how to use it. I am also going to cover things like fees, customer support and supported coins.
After that, I will take a look at GateHub's security features and answer the question "is GateHub safe?". Finally, I will provide you with a really simple step-by-step guide on how to set it up and how to use it!
After this GateHub review, you will have all the needed information to decide whether it’s the right wallet for you!
If you're not some sure about GateHub, though, make sure to check out the top-rated crypto wallet providers, such as Ledger, Binance, and Trezor.
Pros
- User-friendly
- Inbuilt payment gateway
- Relatively safe
Cons
- Security issue in the past
- Lacks security - hot wallet
Table of Contents
What is the GateHub Wallet?
The GateHub platform was created in 2014 by a UK company. When it was first launched, it was built specifically for the Ripple (XRP) cryptocurrency, however, it now supports other coins too. GateHub has two main functions as it not only allows people to store their coins, but it allows people to trade them too!
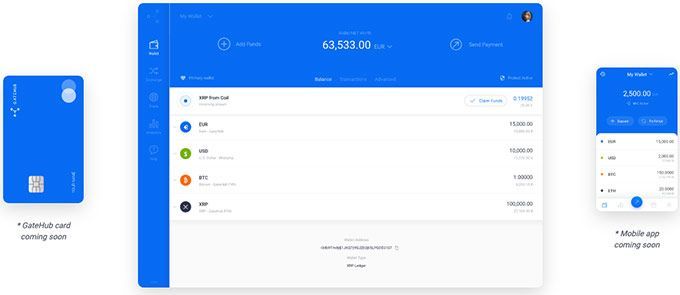
The wallet allows you to send and receive cryptocurrencies, as well as store them. It is also possible to send coins to another GateHub user by entering their username, which makes it super straight forward in comparison to a lot of other wallets. The wallet is accessed online through a web browser, which is available either through a desktop device, Android or iOS.
So, now that you know what the GateHub platform is, the next part of my GateHub review is going to look at how good the wallet is!
How Good is the GateHub Wallet?
My GateHub review found that the wallet is user-friendly and the website is very simple to use. This makes it perfect for beginners. One of the best features is that it not only supports multiple cryptocurrencies but real-world money too! Yes, that’s right — it supports fiat currency, such as USD, etc.
The GateHub wallet was originally built to support Ripple (XRP), but now it supports a total of 8 different coins, which I have listed below.
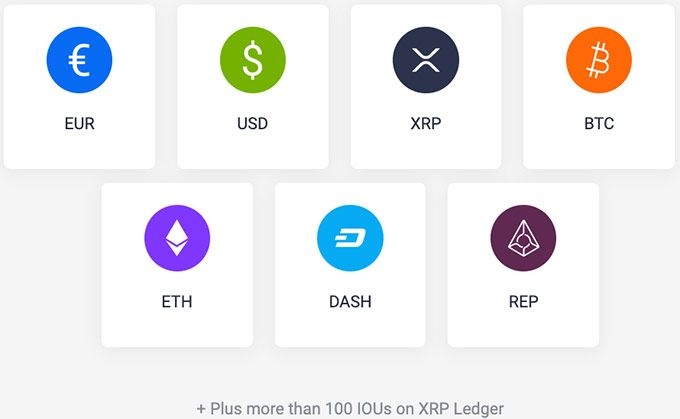
The GateHub wallet also has an inbuilt payment gateway that allows you to deposit real-world money! Before you can do this, you will need to go through a verification process, which will require you to enter your personal information and then upload copies of your ID and proof of address.
Be warned that it can take a few days before your account is verified, so if you need to buy coins quickly you should consider depositing a cryptocurrency instead. If you are happy to do this, you can fund your account using a bank account, which can be through SEPA or SWIFT.
At the time of writing, the payment gateway supports USD, EUR, CNY, and JPY. Overall, the availability of both cryptocurrencies and fiat money, as well as the platform being really simple to use, makes GateHub an excellent choice for beginners.

So now that you know what the GateHub wallet can do, the next part of my GateHub review is going to look at their customer support.

Did you know?
All Crypto wallets may look similar to you but they're NOT all the same!
Customer Support
The majority of wallet providers do not have customer support, however, since GateHub is also an exchange, there are multiple ways to contact them. The easiest way to contact customer support is by sending an email. However, according to online reviews, the support team is pretty slow to respond.
The GateHub team are also on various social media platforms, such as Facebook, Google+, Twitter and LinkedIn. Although the platform has a support team, it is important to remember that if you lose both your authentication key and password or your funds are hacked; there is nothing that GateHub can do.
Now that you know about the customer support available at GateHub, the next part of my GateHub review is going to look at GateHub fees!
GateHub Fees
The first thing to consider when using GateHub is that if you are looking to store Ripple (XRP), you will need to hold a minimum of 20 XRP. You will not be able to use these coins in any way, as it is simply to activate your wallet. For example, if you transfer 50 XRP to your GateHub wallet, you will only be able to use 30 XRP. This is the same system for all Ripple wallets, so there is no way you can avoid it!
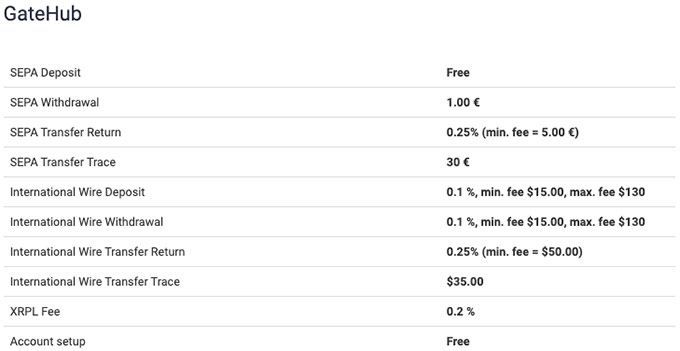
Other than this, there are no GateHub fees for sending and receiving funds, other than the blockchain transaction fee. The platform makes their money from trading, deposit and withdrawal fees. You can find all the information above.
So now that you know about GateHub fees, the next part of my GateHub review is going to look at the wallet’s security!
Security Overview: Is GateHub Safe?
To help protect your GateHub wallet, the platform has installed certain security features. Firstly, you are advised to set up Two Factor Authentication, which will require you to enter a code that is sent to your phone every time you attempt to log in.
Furthermore, if you try to log in from a new IP address or device, you will be required to re-confirm your email address. The platform also encrypts all of its data, which further protects your personal information.
GateHub can never access your private keys as they are stored on a separate server to the main platform. Although this also adds an extra level of security, it also means that if you lose them, you will never be able to recover your funds.
However, in 2017 there was a security issue that resulted in people having their coins stolen. The GateHub centralized servers were hacked, which allowed the criminals to get away with more than $5 million in cryptocurrency. According to various users, GateHub said they would not refund the stolen funds.
The official GateHub statement about the hack that happened is as follows:
"No funds were stolen from the user's wallets. GateHub discovered that a criminal had exploited a flaw in an auxiliary deposit processing service all transactions were honored in full. True there are claims that funds went missing but that was from personal account hacking."
This is very concerning, and it should be a reminder that no matter which cryptocurrency wallet you use, your funds are never 100% safe. Although, Ledger and Trezor hardware wallets are known to be very reliable. So now that you know the answer to ‘Is GateHub safe?’, the next part of my GateHub review is going to look at how to get started!

How to Set Up the GateHub Wallet
If you have decided that you like the sound of GateHub, I am now going to give you step-by-step instructions on how to get started!
1. The first thing you need to do is visit the official GateHub website.
2. You will then be asked if you want to sign in. Instead, click on the Sign-Up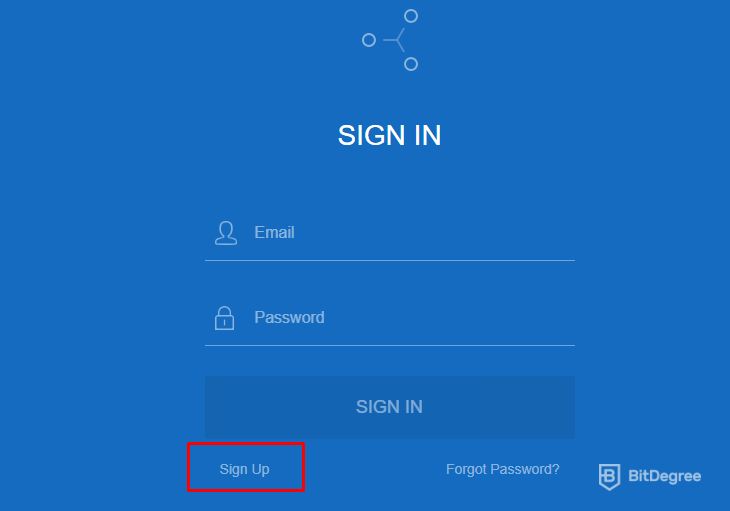
3. Now you will need to enter your email address and choose a strong password. You will also need to click the I’m not a robot box, as well as the Terms and Conditions box!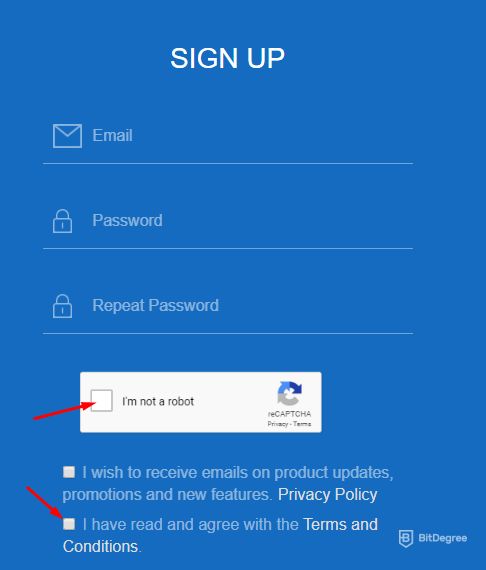
4. You will then be shown your wallet recovery key. This is important as you will need this if you ever forget your password. You can either write it down (recommended), or you can download it to your device as a text file.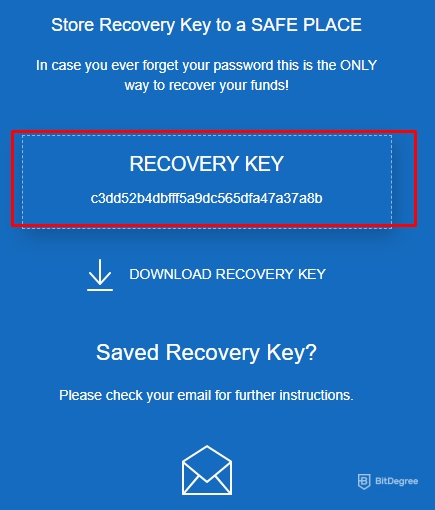
5. Once you have saved your recovery key, you will then need to confirm your email address. You can do this by clicking the Activate Account button in the email sent to you.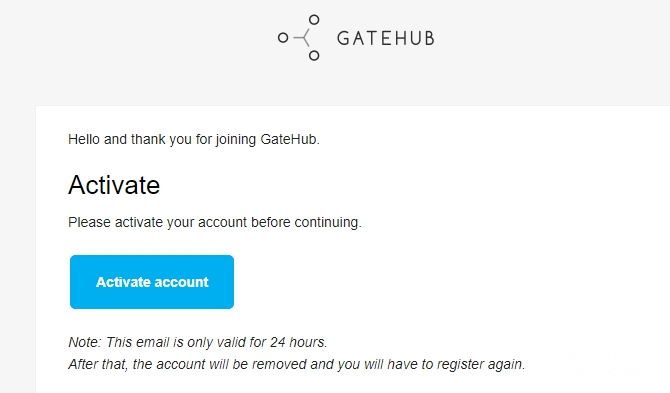
6. Once you sign in, you will then be told that you need to provide more information. Unless you are a company, click on the Individual button!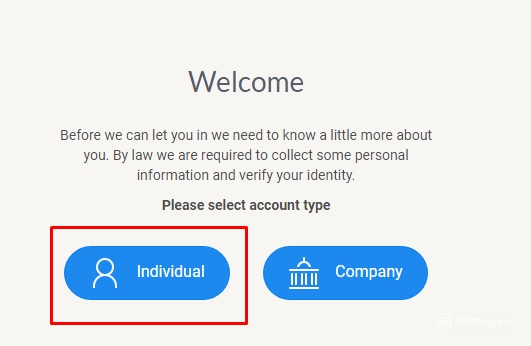
7. First, you need to enter your mobile number. Make sure this is correct as you will need to verify it!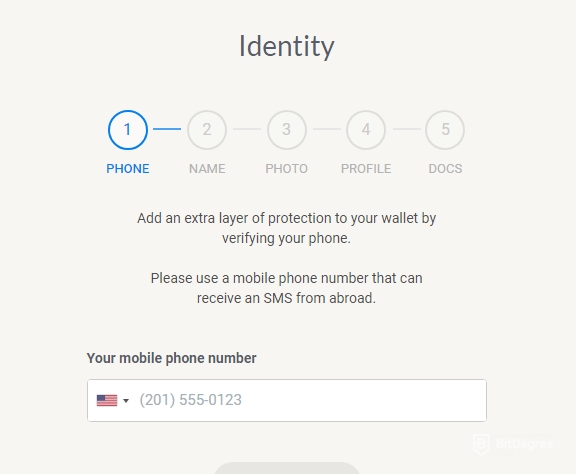
8. Once you receive the SMS code, enter it into the box.
9. If you have successfully verified your number, click on Continue.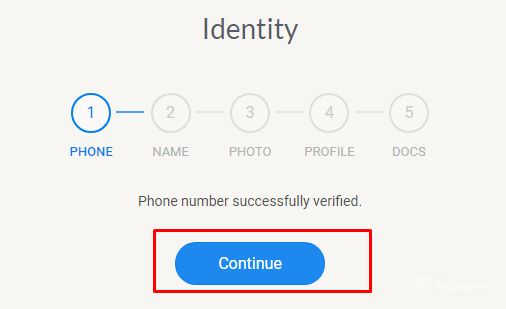
10. Next, you need to enter a public username. This is very similar to a Twitter username, however, it is used to receive funds. This makes it easier to transfer coins within the GateHub platform, as you don’t need to enter a long wallet address!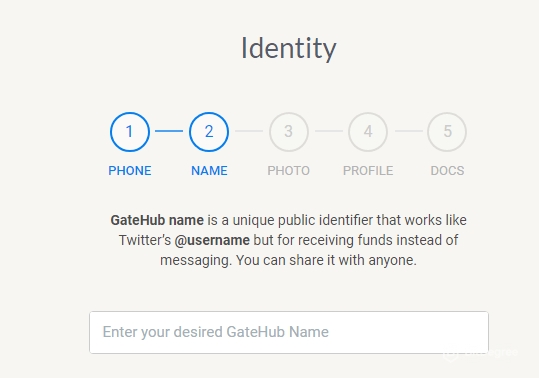
11. Now you are asked to upload a photo! If you don’t want to, you can click on Skip, I’ll do this later.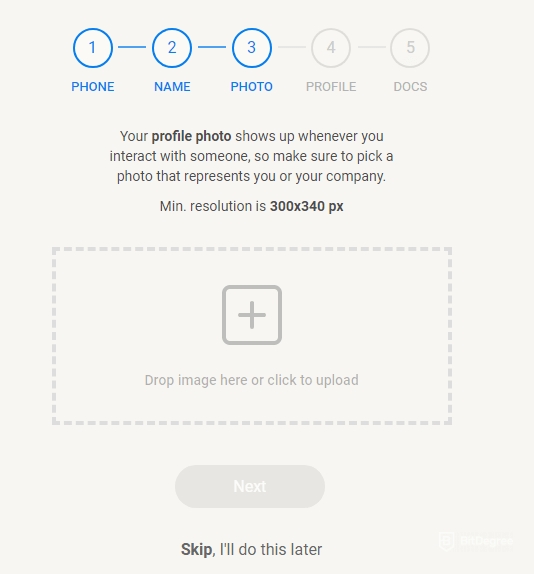
Your wallet is now set up! Well done! The next thing that you need to do is set up Two-Factor Authentication. This will add an extra layer of security to your account, as every time you log in, you will need to confirm a code that is sent to your phone! Although you are not forced to do this, I highly recommend it!
1. Click on Enable 2-Factor Authentication.
2. You will need to download Google Authenticator on your mobile phone, which is available on both ioS and Android.
3. Now you need to link your Google Authenticator to your GateHub account. You can do this by either entering the Authentication Key or by scanning the QR code.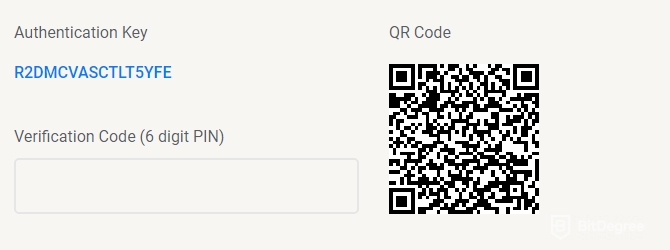
4. Now that you have set up Two Factor Authentication, your account is more secure!
So now that you know how to set up your wallet, the next part of my GateHub review is going to show you how to use it!
How to Use the GateHub Wallet
Let me provide you with a step-by-step guide on how to use the GateHub wallet.
1. On the left-hand side, click on Wallet.
2. You will now be shown your wallet balance, which is in Ripple (XRP) by default. As you will see, your wallet is disabled until you deposit at least 20 XRP. This 20 XRP cannot be spent, transferred or withdrawn, which means that it is a free-to-use wallet. Unfortunately, this is the same for all Ripple (XRP) wallets.
3. To fund your account, scroll down and look for your wallet address. If you already hold XRP then this is the easiest way as you can simply transfer the coins straight into GateHub. Simply paste the GateHub wallet address into the recipient field of your current wallet, send the transaction, and the funds should arrive in your GateHub account in less than a minute!
4. If you do not currently hold XRP, you can deposit using real-world money! Alternatively, you can also deposit using other cryptocurrencies too. To do so, click on Deposit/Receive.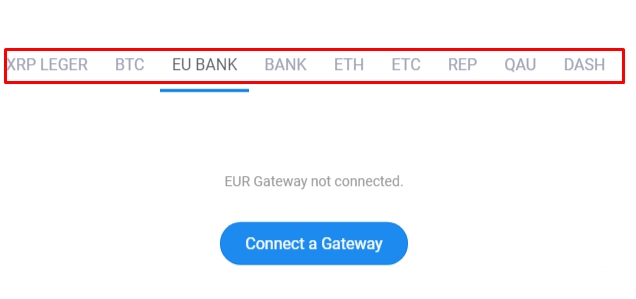
5. If you currently have a European Bank account, click on EU BANK, followed by Connect a Gateway. Just remember, if you want to use real-world money, you will need to verify your identity first. Don’t worry, my GateHub review will show you how to do that below!
6. Firstly you will need to enter your details. This includes your full legal name, date of birth, home address and gender.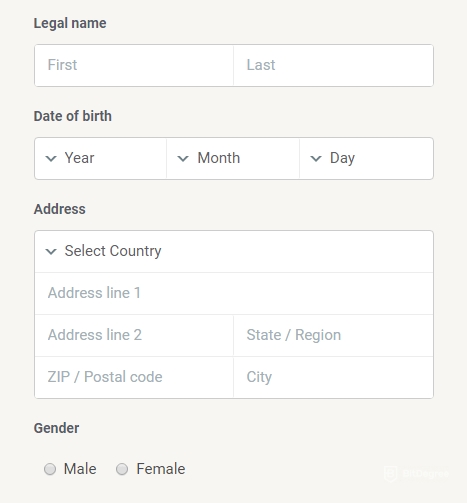
7. Now you will need to provide some documentation. For your ID, you can either use a passport, driving license or national identification card. Enter the serial number into the box and then upload the image.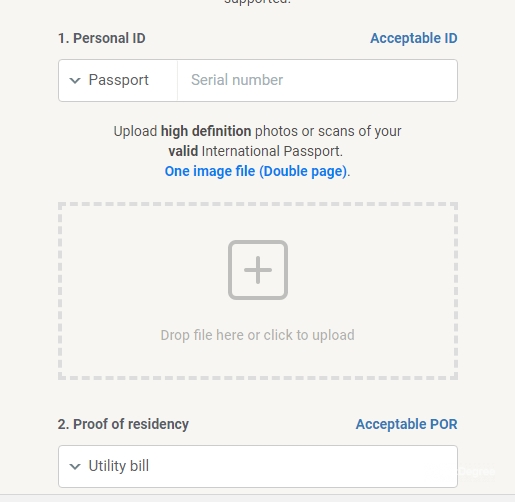
8. After this, you will also need to upload a proof of address. This can either be a utility bill, bank statement, tax return or certificate of residency.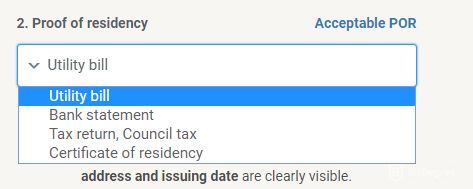
9. Once you click on submit, the GateHub team will review your documents and once they have, you will be able to deposit funds using your bank account! The time it takes the team to do this depends on how busy they are, so be prepared to wait a few days.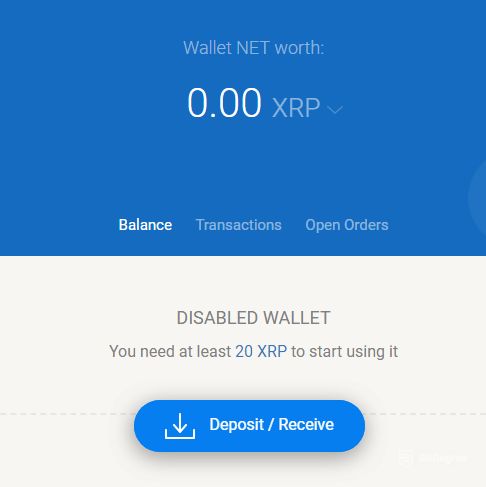
So now that you know how to set up your GateHub wallet and how to verify your account, the next part of my GateHub review is going to explain how to send funds to another wallet!
How to Send/Receive
- First, click on the Wallet on the left-hand side.
- After that, click on Send Payment, followed by Instant.
- You will now need to enter your GateHub password.
- Select the cryptocurrency that you want to send, along with the amount.
- Now enter the wallet address that you want to send the funds to.
- To complete the transaction, make sure that you are happy with the amount you are transferring and then click on Confirm.
And that’s it. You’ve now successfully made your first transfer within the GateHub!

- User-friendly design
- Robust security
- Long battery life

- A brand-new design
- Industry-leading security
- Coin, token and NFT storage

- Supports 1,000+ crypto assets
- Easy navigation
- Open-source
GateHub Review: Conclusion
And that’s the end of my GateHub review!
Overall, I think GateHub is a good wallet for beginners. It not only supports multiple coins, but you can store fiat currencies too! Furthermore, I like the fact that you can use GateHub to buy, sell and trade cryptocurrencies!

|

|
|
|---|---|---|
| Hardware | Hardware | |
| Safely Storing, Sending, and Receiving Different Cryptocurrencies | Easily Controlling Funds and Managing Balance | |
| All Ledger Nano X Coupons | See All Coupons of Best Wallets | |
| One of the best hardware cryptocurrency wallets ever made. | One of the most-secure cryptocurrency hardware wallets on the market. | |
|
Visit site
Read review |
See TOP10 Brands
Read review |
Table: The Ledger Nano X and Trezor Model T hardware crypto wallets
The only issue I have with the GateHub wallet is that it was hacked in 2017 and did not refund any of the people affected. Even though no hacks have happened since it should be a reminder that your funds are never 100% safe. In this sense, it might be worth considering a reliable hardware wallet, such as Ledger and Trezor.
I hope that this GateHub review was helpful and you've already decided whether it's suitable for you.
The content published on this website is not aimed to give any kind of financial, investment, trading, or any other form of advice. BitDegree.org does not endorse or suggest you to buy, sell or hold any kind of cryptocurrency. Before making financial investment decisions, do consult your financial advisor.


