Stop overpaying - start transferring money with Ogvio. Sign up, invite friends & grab Rewards now! 🎁
There are thousands of digital tokens out there, and more are created every day. But guess what? You can create one, too – anyone with a sprinkle of imagination and a bit of technical knowledge can. So, follow my guide on how to create a token on BSC, and you’ll launch one in no time!
Why BSC, though? Well, there are many reason why Binance Smart Chain is great for token creation, including low fees, fast transaction speeds, compatibility with Ethereum, developer-friendly tools, and so on. However, if you want to create a token on another chain, the process will basically be the same.
For the token creation itself, I’ll be using Remix (Ethereum IDE), an open-source environment, which can be used for deploying, debugging, developing, and testing Ethereum and EVM-compatible smart contracts.
Ready to create BSC tokens? Let's roll!
How to Create a Token on BSC?
First things first, since you might want to have a test run or simply know how to create a BSC token for free, in this guide, I’ll explain how to launch one on the BNB Smart Chain testnet. However, keep in mind that if you want to create a token on Binance Smart Chain mainnet (or any other blockchain, for that matter), the process would be almost identical.
Latest Deal Active Right Now:Before going into detail, here is a short version of this "how to launch a token on BSC" guide:
- Set up a wallet extension and make sure to have tBNB;
- Connect your wallet to Remix;
- Create a smart contract for your token;
- Compile and then deploy your smart contract;
- Find the full supply of your tokens in your wallet (if not, make a transfer from Remix);
- Mint these tokens.
Now, let’s go over this more thoroughly.
Step 1: Make sure you have a Web3 wallet extension set up on your browser. For the sake of this “how to make a token on BSC” tutorial, I’ll use my Coinbase Wallet. However, the process should be basically the same with other wallets as well.
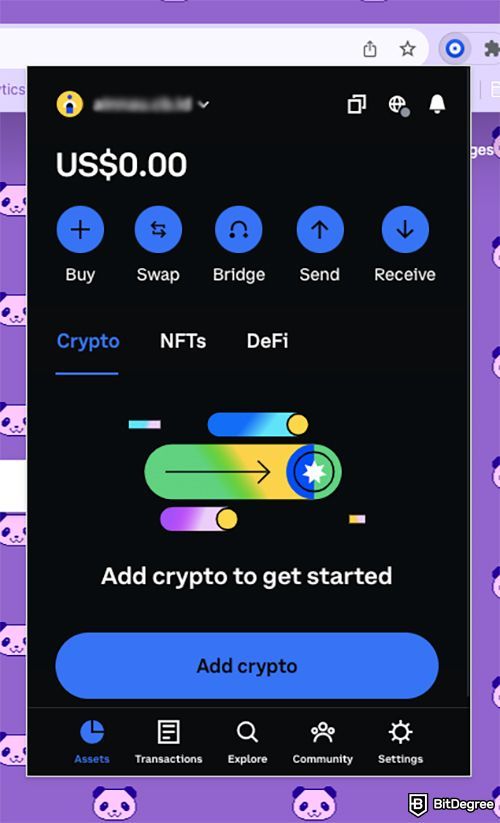
If you’ve never used testnets with your wallet, you’ll first have to enable them. With Coinbase Wallet, you have to go to Settings > Developer and then click the switch to enable testnets.
Just note that you must have at least 0.005 ETH in your wallet to use testnets. If you don't have it and don't want to get it, you can use another wallet – MetaMask, for example.
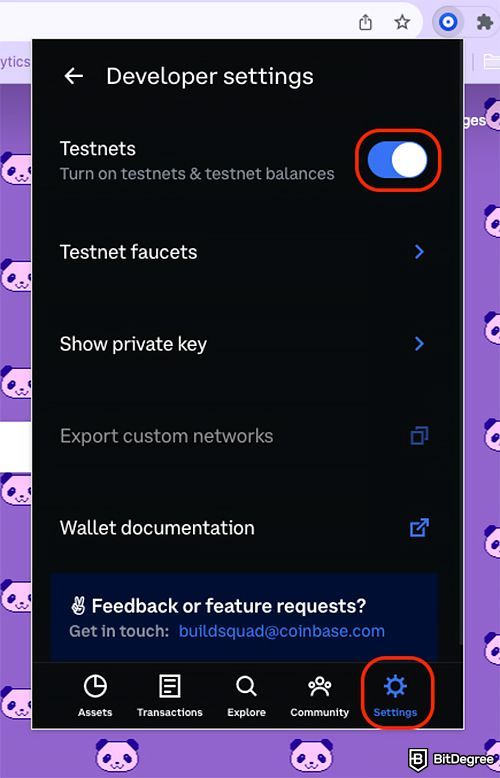
Step 2: You must have BNB testnet tokens (tBNB) in your wallet because you’ll need them to create BSC tokens. There are two options for claiming them (you can use both to get more):
Go to BNB Smart Chain Faucet, enter your wallet address, and click “Give me BNB”. This can be used with any wallet.

If you’re using Coinbase Wallet, however, you can also utilize its built-in faucet. Go to Settings > Developer > Testnet faucets > BNB (Binance Smart) Chain and then click “Request BNB”.
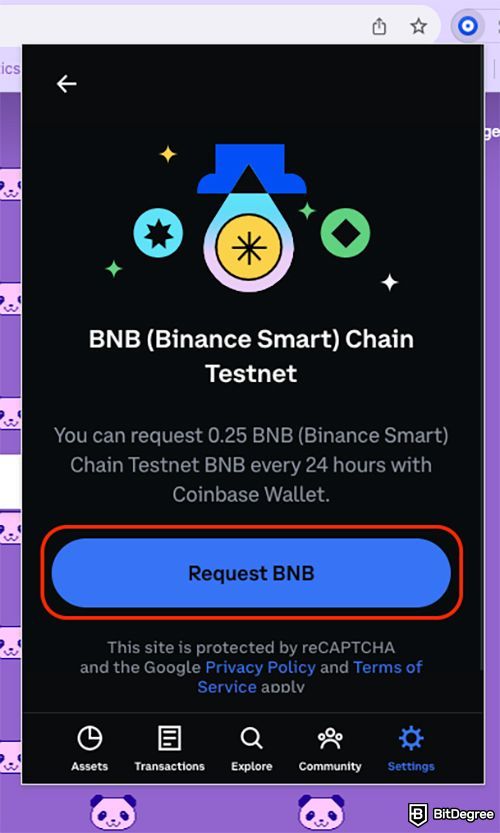
You’ll find your testnet tokens in the "Assets" tab. To be more precise, in a separate category called “Testnets,” which should be in the same line as “Crypto,” “NFTs,” and “DeFi”. Just note that it might take a few minutes before they appear in your wallet.
Step 3: Go to Remix and connect your wallet. Click on the “Deploy & Run Transactions” tab and select “Injected Provider” in the “Environment” box. A browser extension will then ask which wallet you want to use.
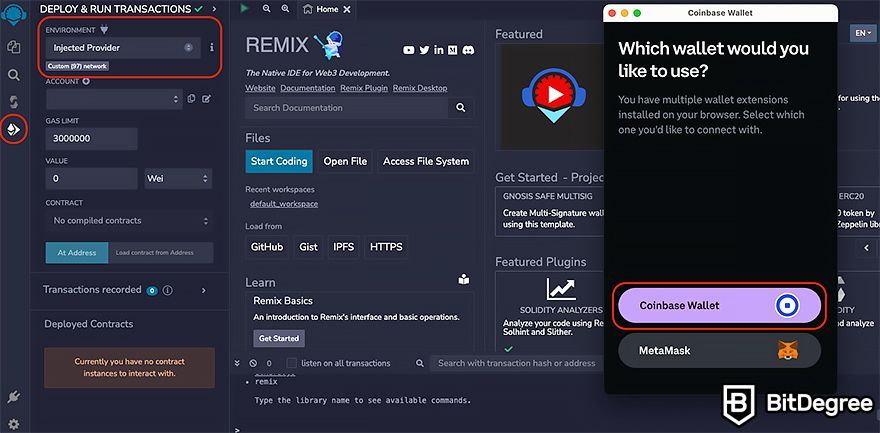
I have MetaMask and Coinbase Wallet connected to my browser, for example, so I had these two options. Since we’re using the Coinbase wallet in this “how to make a BSC token” guide, let’s go with that option. Just click “Coinbase Wallet” and then “Connect”.
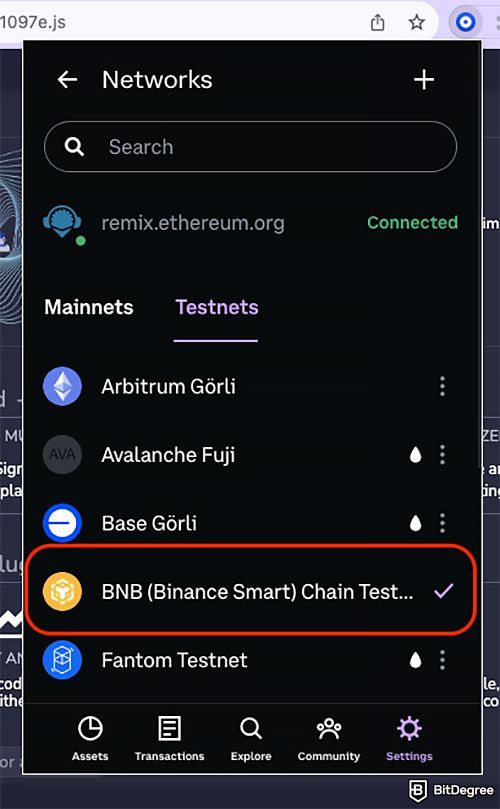
Once that is set, you’ll have to change the network on your wallet. Got to Settings > Networks. You can change it to whichever you want to use for deploying your tokens, but since we’re talking about a test run on the BNB Chain testnet, go to “Testnets” and choose this network.
Step 4: All these steps were preparations; now, let's start with the actual “Binance Smart Chain create token” part. Firstly, you'll need to create a proper smart contract for your token. Go to the “File Explorer” tab, click on the “Contracts” folder, and choose whichever available contract example (or you can create a new one).
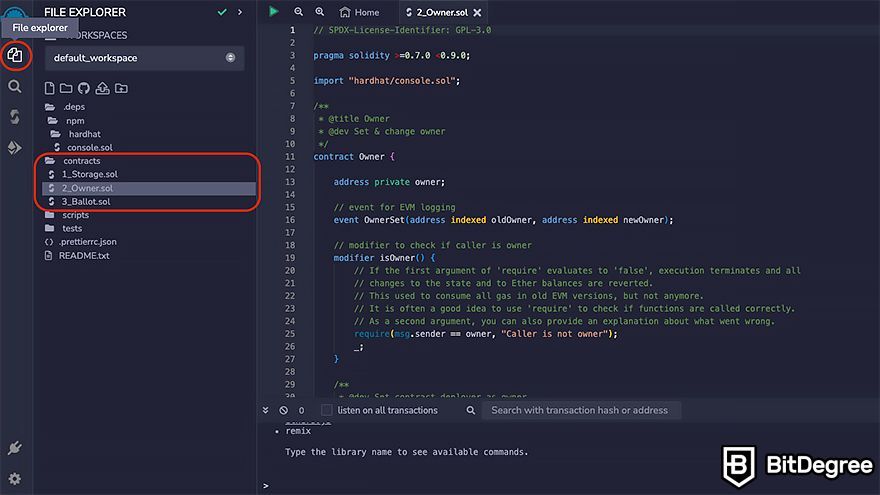
Delete the code you find in the code window and replace it with one for a token smart contract. Here is a sample you can use:
|
Of course, you should tweak this contract to make it your own – choose another token name (string public name), ticker symbol (string public symbol), token supply (uint public totalSupply), and so on. You can go beyond that as well, if you are more advanced with coding and smart contracts.
Step 5: It’s time to compile your smart contract. Go to the “Solidity Compiler” tab and click on the “Advanced Configurations” subtab. Now, in the “EVM VERSION” field, choose “Paris”.
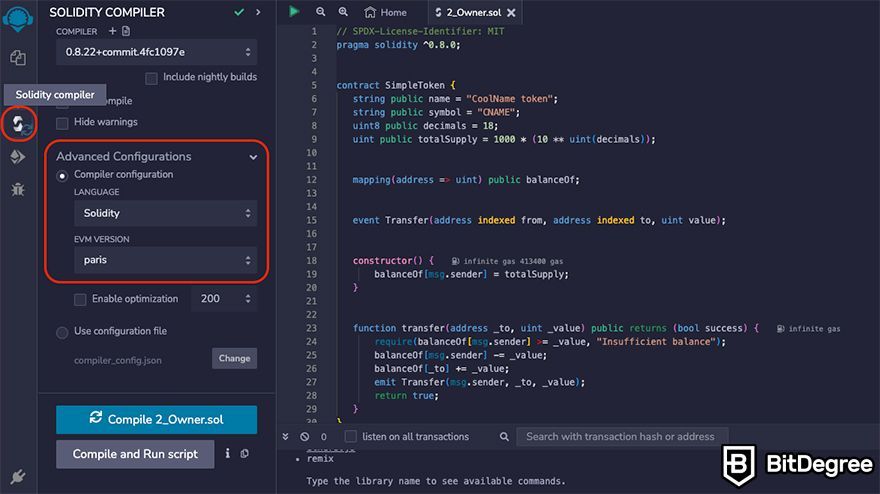
You need to do that because the newest version of EVM does not support all testnet features yet. If you’re not using a testnet and creating your token straight on the mainnet, you don’t need to do that. Also, make sure that Solidity is set as the programming language. Otherwise, your smart contract won’t work.
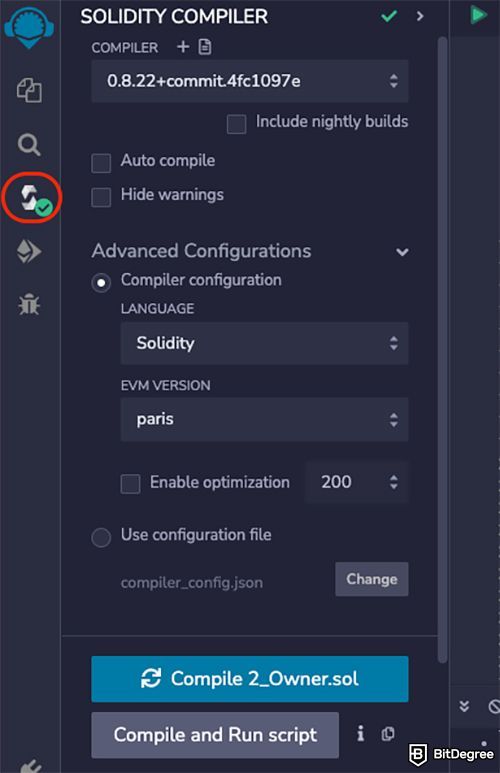
Now, click on the “Compile and Run script” button or simply press CTRL+S. If everything is successful, a green mark should appear on the “Solidity Compiler” tab.
Step 6: Now, go to the “Deploy & Run Transactions” tab again and click “Deploy”. Just make sure to unclick the “listen to all transactions” option. If it is checked, Remix will listen to all transactions mined in the current environment, not only those created by you.
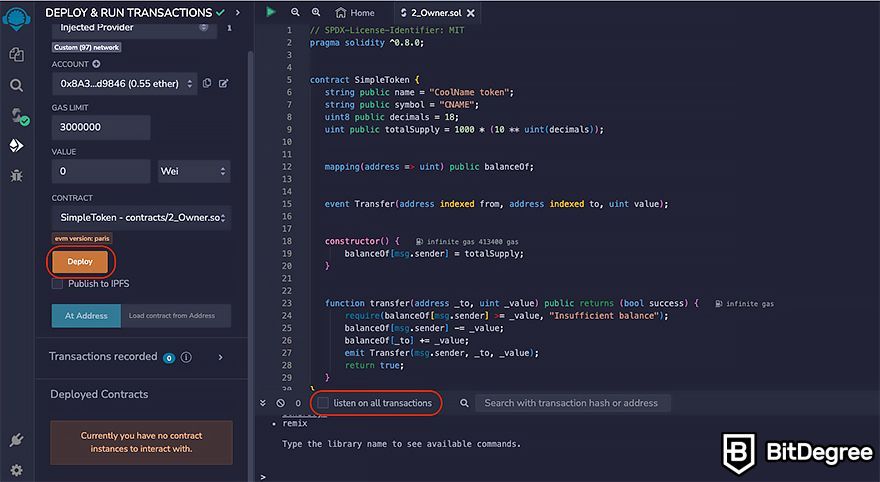
Your wallet extension will pop up, asking you to confirm the deployment. Click “Confirm,” and that’s it, your contract is deployed!
Since I already connected my Coinbase Wallet to Remix, my contract was deployed using that wallet, but you can choose another wallet via the "Environment" field as well.
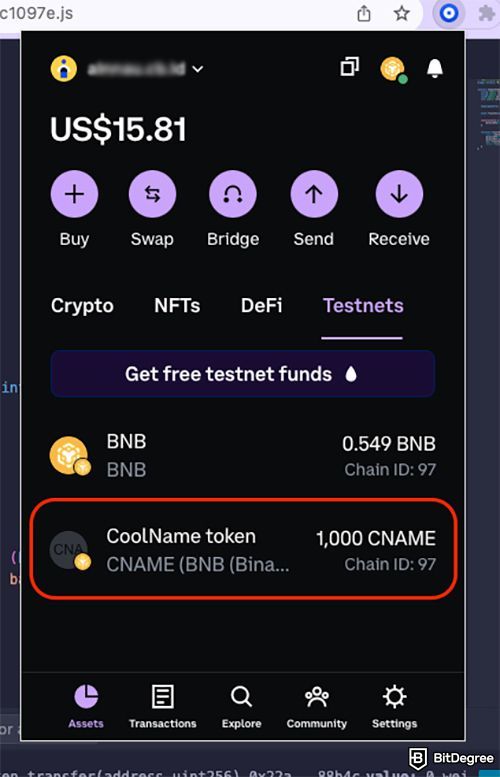
Step 7: The full supply of your tokens should appear in your wallet under the “Testnets” tab. Just keep in mind that some wallets add tokens automatically (like Coinbase Wallet), while with others, you need to add token smart contracts by hand to see them.
However, while my wallet added the tokens automatically, I didn’t see them at first. So, I made a token transfer from Remix to trigger my Coinbase wallet to see these tokens. To do that, you need to click on the “Deployed Contracts” tab, expand your contract, and click on the “Transfer” field.
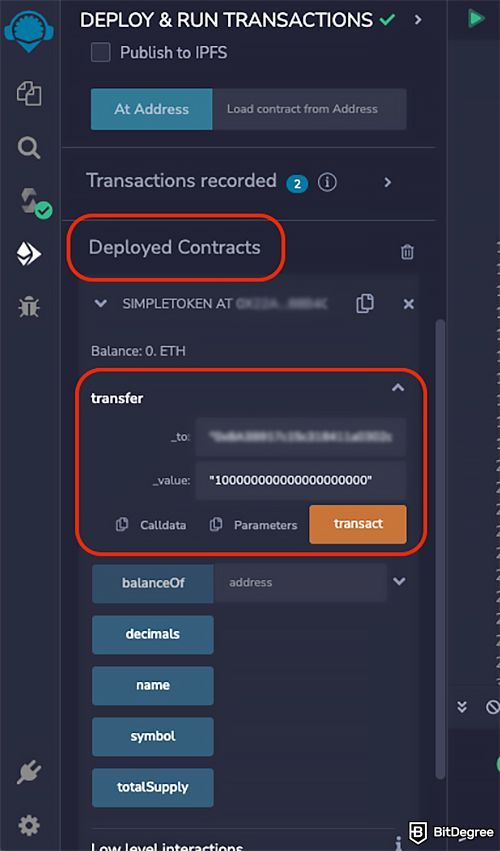
Then, input your wallet address in the “_to” field and the number of tokens you want to transfer in the “_value” field (the number doesn’t matter in this case because you already have the full supply in your wallet, you just need to send some to trigger your wallet to display them). Eventually, click “Transact” – you should now see the full supply of tokens in your wallet (mine was 1,000).
Congratulations, you now know how to create a BSC token! Since this is a test run, we’ll stop here, but if you want to put your token out there and list it on Binance or other exchanges, you’ll also have to mint it and create a solid crypto project overall.
Conclusions
So, there you have it! I know that at first glance, the coding windows in this “how to create a token on Binance Smart Chain” guide might appear a tad daunting. However, as you see – it's not as complicated as it seems, especially if you're sticking to the basics without diving into advanced modifications of the sample code.
Just a reminder: ensure you have a Web3 wallet extension installed on your browser and a stash of BNB tokens (or tBNB if you're experimenting with how to create a token on BSC testnet).
With that said, I hope your token-launching experience was nothing short of thrilling, and that you plan to create more BSC tokens in the future!
The content published on this website is not aimed to give any kind of financial, investment, trading, or any other form of advice. BitDegree.org does not endorse or suggest you to buy, sell or hold any kind of cryptocurrency. Before making financial investment decisions, do consult your financial advisor.
