Key Takeaways
- You can use the BitMart exchange for trading over 1,400 cryptocurrencies and over 100 futures contracts;
- BitMart offers a variety of trading options, including spot, margin, futures, and copy trading, along with earning features like staking, savings, a referral program, and more;
- You can use the BitMart exchange via the desktop version or mobile app and even connect it to other platforms using APIs.
Stop overpaying - start transferring money with Ogvio. Sign up, invite friends & grab Rewards now! 🎁
Decided to use BitMart but are unsure how to do so? Don’t worry, I’ve personally explored every corner of the platform and put together an easy-to-follow guide on how to use the BitMart exchange just for you.
Whether you're setting up your account or mastering all the key features, I’ve got you covered with a step-by-step walkthrough.
So, let’s explore BitMart together!

Did you know?
Subscribe - We publish new crypto explainer videos every week!
What Are Crypto Quests? EASIEST Ways to Earn Rewards Explained


Table of Contents
- 1. Things to Know Before Using BitMart
- 1.1. Can I Use BitMart in the USA?
- 1.2. Does BitMart Require KYC?
- 1.3. Are BitMart Fees Competitive?
- 2. How to Use the BitMart Exchange?
- 2.1. How to Sign Up?
- 2.2. How to Pass KYC?
- 2.3. How to Buy Crypto on BitMart?
- 2.4. How to Deposit/Withdraw Crypto to/from Bitmart?
- 3. Trading on BitMart
- 3.1. Spot & Margin Trading
- 3.2. Futures Trading
- 4. Earning on BitMart
- 5. Conclusions
Things to Know Before Using BitMart
If you want to immediately get into the gist of how to use the BitMart exchange, you can skip to the next chapter. However, there are a few very important things you need to know before starting: its geographical availability, KYC requirements, and, of course, BitMart fees. Thus, let’s address some of the most commonly asked questions regarding these topics.
Latest Deal Active Right Now:Can I Use BitMart in the USA?
Yes, you can use BitMart in the USA, albeit with quite a few restrictions (and it doesn't actively accept any new USA-based users as of writing). Traders from the USA who already have an account on BitMart can use all its informational resources and participate in limited spot trading. By “limited”, I mean that they will not be able to trade all the same currencies that are available for those who live in unrestricted countries.
Other features are mainly unavailable to USA-based traders. So, if you were wondering, “Can I use BitMart in the USA for earning via savings, staking, and other tools, or for futures trading?”, you cannot.
This is completely normal, crypto regulations in the USA are very strict[1], so the fact that BitMart provides some services there is a huge plus (most exchanges don't).
Overall, BitMart is available in over 180 countries, which makes it a truly global exchange. However, as of writing, it does not provide services to residents from the following areas:
Afghanistan, Balkans, Belarus, Burma, China (Mainland), Cote D’Ivoire (Ivory Coast), Cuba, Crimea, Democratic Republic of Congo, Iran, Iraq, Liberia, Netherlands, North Korea, Sudan, Syria, Zimbabwe, the State of New York, and the so-called Donetsk People's Republic (DNR) or Luhansk People's Republic (LNR).
Does BitMart Require KYC?
Yes, BitMart does require users to pass KYC. There are two KYC levels: Starter and Advanced. They differ in verification requirements, daily withdrawal limits, and the services you can access.
| Starter | Advanced |
|---|---|---|
Verification Requirements | Personal information | Starter level, government ID, and facial verification |
Daily Withdrawal Limit | 0.5 BTC | 100 BTC |
Deposit | ✓ | ✓ |
Buy/Sell Crypto | ✓ | ✓ |
Spot Trading | ✓ | ✓ |
Margin Trading | ✗ | ✓ |
Futures Trading | ✓ | ✓ |
Earning | ✗ | ✓ |
Launchpad | ✗ | ✓ |
NFT Market | ✓ | ✓ |
Voting List | ✗ | ✓ |
Table: BitMart KYC level comparison.
By the way, here, I’m talking about personal verification, but BitMart also provides exclusive professional services for institutional users, and they also have to pass KYC. Institutional verification is a bit more advanced, and you cannot access any services without it.
To pass institutional verification, users have to fill out/provide the following:
- Due diligence questionnaire
- Corporate board resolution
- Anti-money laundering questionnaire
- Corporate formation documents
- ID documents of authorized account signers
- ID documents of beneficial owners
FYI, institutional users have to be very careful because they can submit the verification for the certification process only once for the same institution.
Now, how to use the BitMart exchange without KYC? Well, you can’t use it per se, but you can sign up and explore it.
It definitely is a benefit because some exchanges require you to pass KYC during the signup process, preventing you from “looking inside” the platform without submitting your information. While there’s nothing wrong with that, I personally like to first get a feel of the platform before committing to it.
That said, if you decide you actually want to use the BitMart exchange, you’ll have to pass it eventually (you can find a thorough explanation of how to do that in the next chapter).
Are BitMart Fees Competitive?
Yes, BitMart fees are pretty competitive. When it comes to futures trading, BitMart charges a 0.02% fee for all makers and a 0.06% fee for takers. There's not much else to discuss here, especially given that it’s the most standard futures trading fee.
For margin trading on BitMart, fees depend on the asset in question. Both the initial interest rate and the hourly rollover interest rate are the same. For example, for Ethereum, it’s 0.002291% – I’ve noticed this is the most common margin fee on BitMart.
As for BitMart withdrawal fees, they differ based on the cryptocurrency you plan to withdraw and the network you choose for the withdrawal. Plus, there is a minimum withdrawal limit. So, for example, if you want to withdraw Bitcoin via the BTC network, you’ll have to withdraw at least 0.00105 BTC and pay a 0.001 BTC fee.
Considering deposit fees, there usually are none. Though, the keyword is “usually”, as some assets do impose a fee (1-2%), but they are pretty niche ones, if you ask me.
Now, BitMart spot trading fees depend on whether you're a maker or a taker, your trading volume, and your BMX balance (BitMart’s native token), as well as the trading pair class.
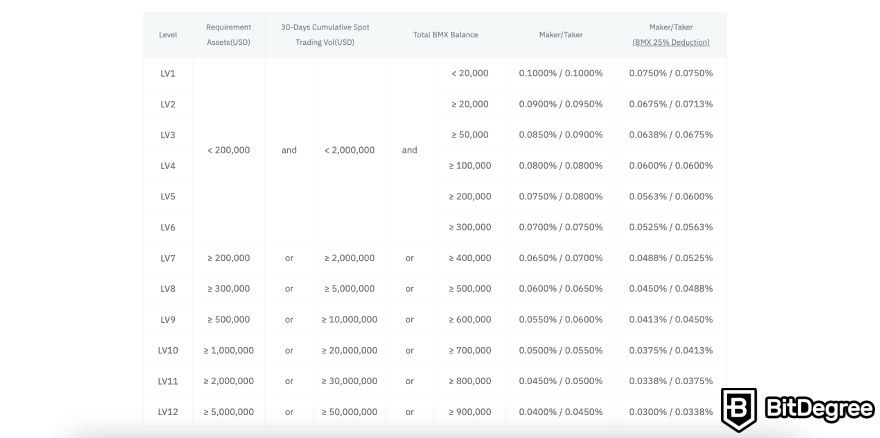
Most of these factors are pretty standard. Maker and taker fees almost always differ on the spot market, and reducing fees based on the trader’s volume or the exchange’s native token balance is also a pretty common practice that many exchanges apply.
All the “standard” practices aside, charging fees based on the trading pair class is not so common. I have seen it on a few exchanges, but usually on those that support a huge number of crypto assets (BitMart falls in this category, too).
That said, on BitMart, trading pairs are divided into four classes based on their popularity: Class-A, Class-B, Class-C, and Class-D. The most popular trading pairs fall into Class-A (and charge the lowest fees), while the least popular ones fall into Class-D (and charge the highest fees).
What are those fees, exactly?
Initially, if you’re a LV1 user, no matter if you’re a maker or a taker, you’ll have to pay the following fee:
Class-A | Class-B | Class-C | Class-D |
|---|---|---|---|
0.1% | 0.25% | 0.4% | 0.6% |
Table: BitMart spot fees based on trading pair classes.
Thus, BitMart fees are competitive if you plan to engage with popular trading pairs, but they might get quite costly if you want to get into very niche ones.
Though, I have some good news for you - there are ways to lower those fees. The first way, as you already know, is to increase your trading volume, BMX balance, or account balance overall. The more you hold and the more active you are, the lower your fees will be.
On top of that, you can get an additional 25% discount by covering your spot fees using the BMX token. So, for example, even though Class-D fees start at 0.6% (which is a pretty high fee), you can reduce it to as low as 0.165% for makers and 0.18% for takers.
Considering everything we’ve covered, here’s my tip for you: be as active as possible and use that magic BMX token to your advantage. Also, you can find a more thorough explanation of BitMart’s fees (and what is BitMart overall) in this review.
How to Use the BitMart Exchange?
Now that you’re equipped with all the necessary knowledge, let’s talk about how to use the BitMart exchange step-by-step. If you’ve jumped straight into this chapter, make sure you’re aware of things like BitMart withdrawal and other fees, geographical availability, and KYC requirements.
Also, note that, accessibility-wise, you can use BitMart both via desktop and mobile devices. Besides that, you can import it into other platforms using APIs. In this “How to use the BitMart exchange” guide, I’ll focus on its desktop interface (but if you know how to use it on a desktop, you’ll have no problem with the BitMart mobile app, too).
How to Sign Up?
First things first, signing up. Truthfully, BitMax employs the most basic and intuitive signup process, so you won’t get lost.
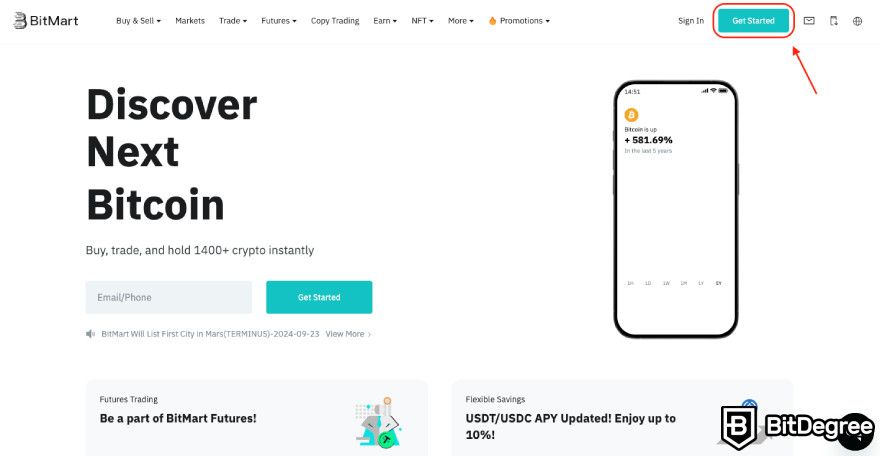
Step 1: Go to the BitMart homepage and click [Get Started].
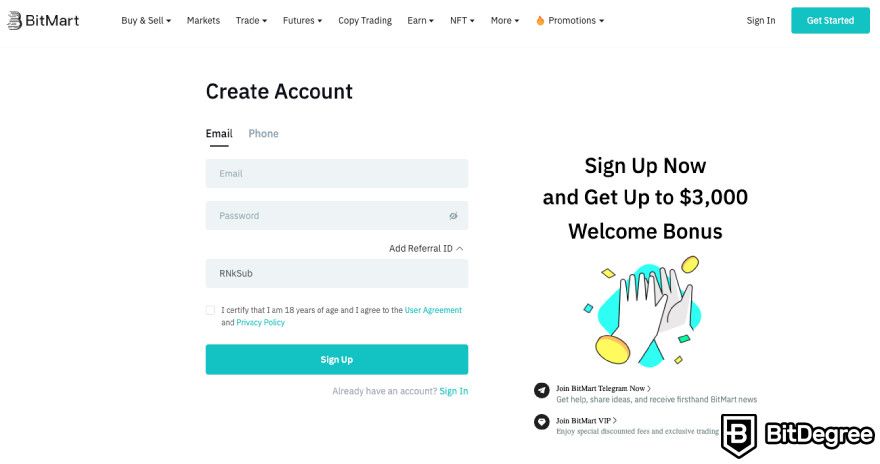
Step 2: A registration window will open. Here, fill out all the required information and click [Sign Up].
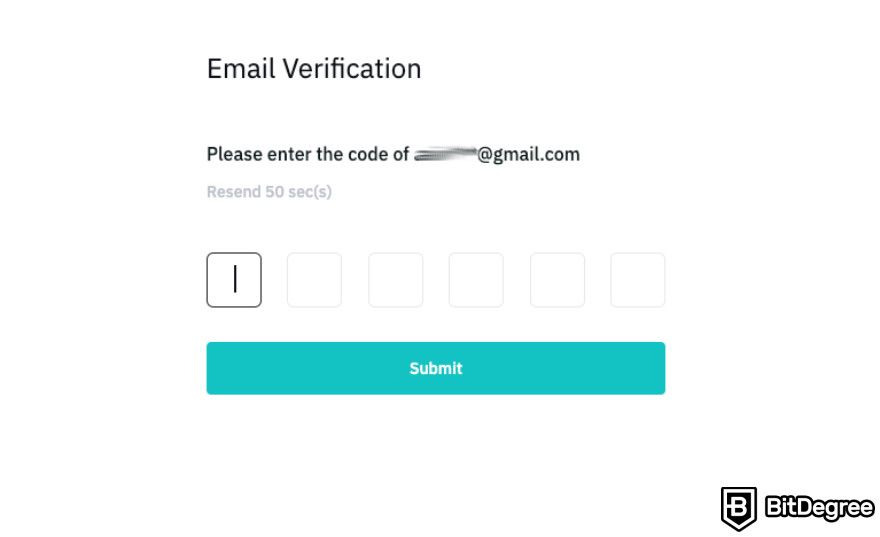
Step 3: Verify your email or phone number (whichever you’ve used when signing up).
That’s it, you have an account! However, I suggest you strengthen your account security before using the platform. Just go to your account’s security tab and enable two-factor authentication via your phone or Google Authenticator (or both). Also, you can set an anti-phishing code.

Did you know?
Subscribe - We publish new crypto explainer videos every week!
Candlesticks, Trendlines & Patterns Easily Explained (Animated Examples)


How to Pass KYC?
Again, does BitMart require KYC? Yes, if you really want to use BitMart exchange’s features, you’ll have to pass KYC. Initially, you’ll need to pass the Starter level. Here’s how:
Starter KYC Level on BitMart
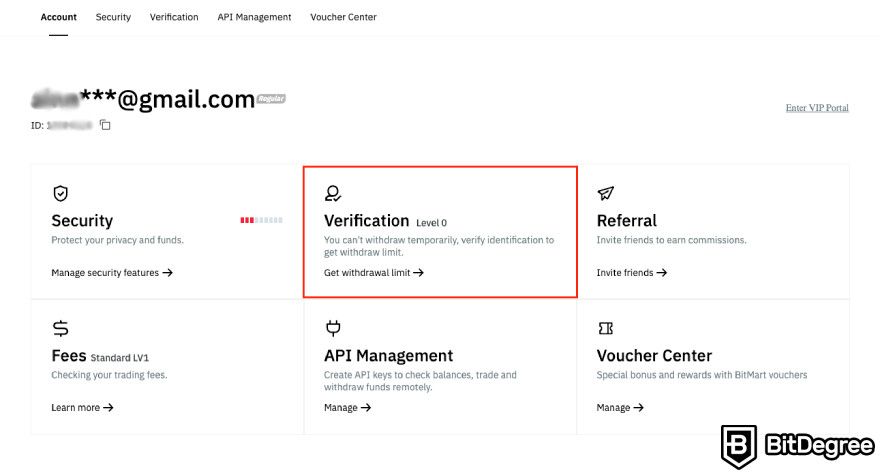
Step 1: Go to your account and click on [Verification].
Step 2: Click on [Verify Now].
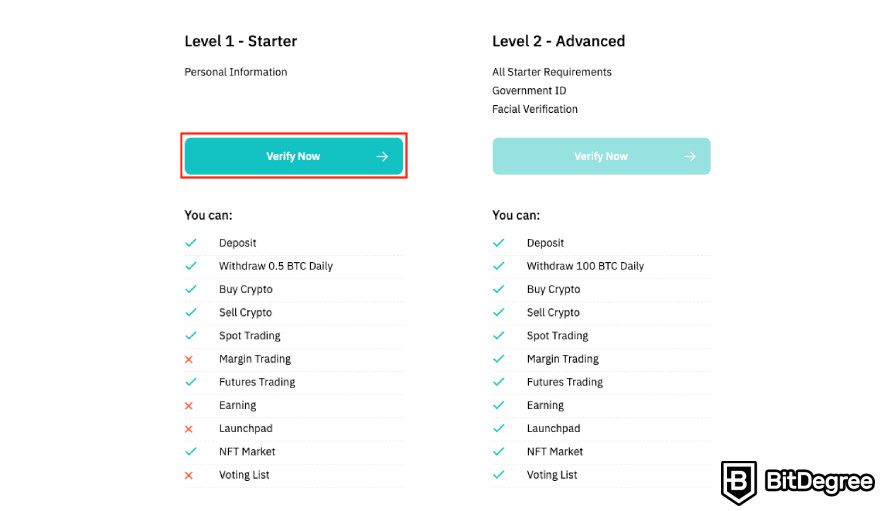
Step 3: Provide the required information:
- Country of residence
- First and last name
- Date of birth
Just make sure all this information matches your government ID, as you’ll have to provide it during the next verification level.
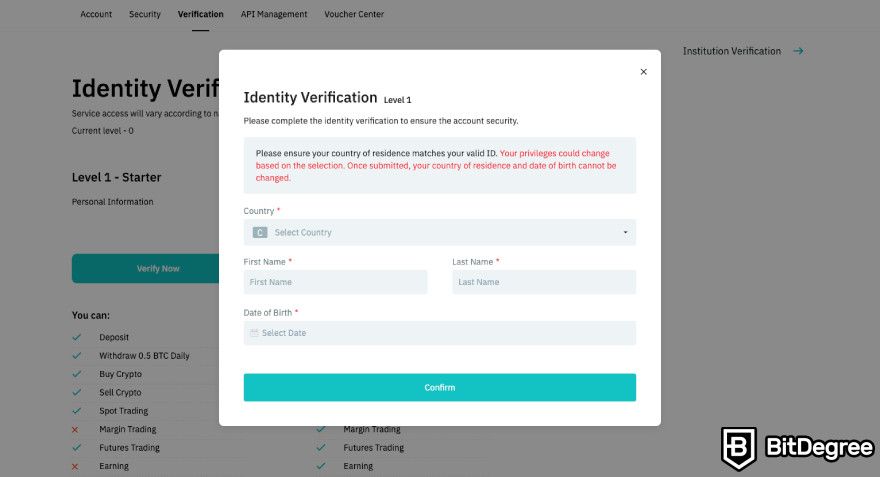
Step 4: Once you fill out the information, click [Confirm], and you’ll be done (if the Starter level is enough for you).
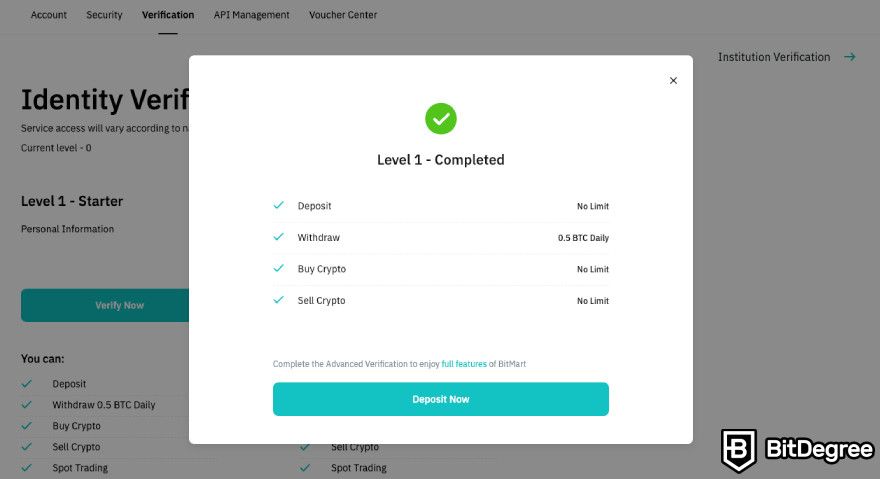
This is actually a huge pro of BitMart – its first KYC level is very easy and quick to pass. Most other exchanges require you to provide a government ID and proof of address to pass the first level. While there’s nothing wrong with that (after all, it’s for security and compliance reasons[2]), not everyone wants to do that, and it does bring more hassle.
Don’t forget, though, the Advanced level unlocks way more features and increases your withdrawal level (+ you only need to provide your ID and a selfie, no proof of address).
Advanced KYC Level on BitMart
Here’s how you pass the second KYC level on BitMart:
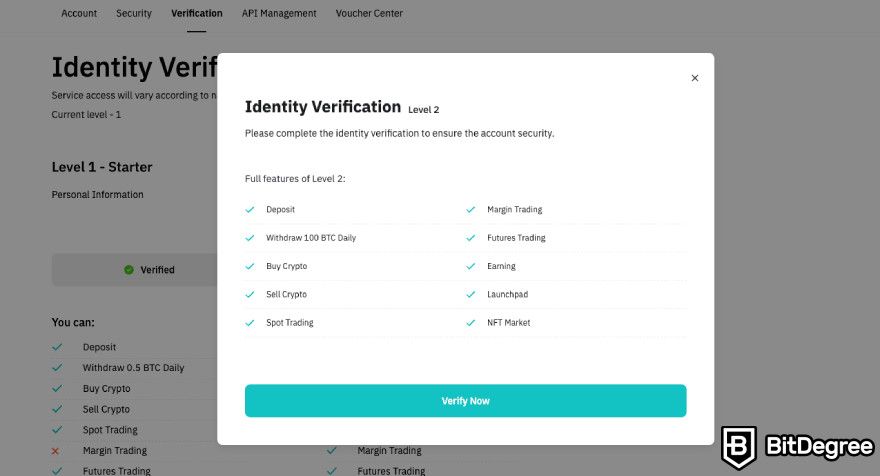
Step 1: Go to the same [Verification] tab in your account you went to to pass the Starter level and click on [Verify Now] next to the Advanced level.
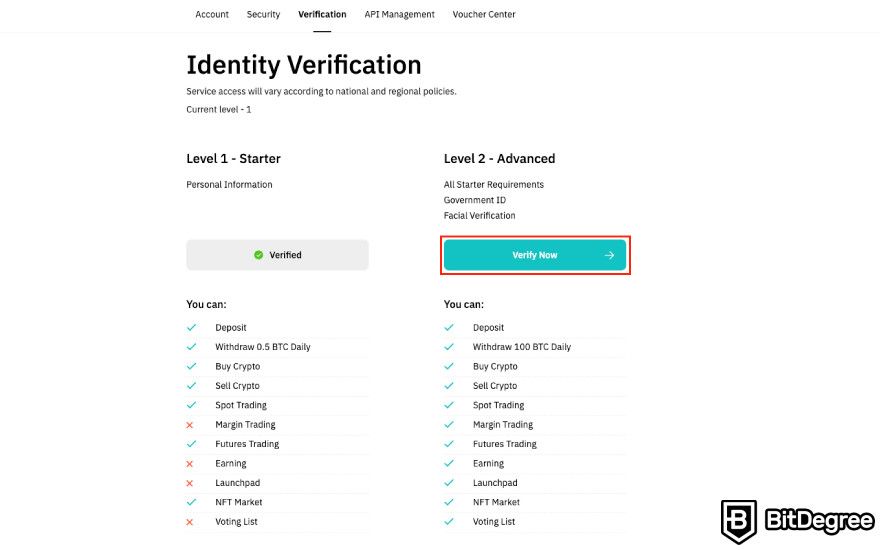
Step 2: A window with the features you’ll unlock will appear. Click [Verify Now] again.
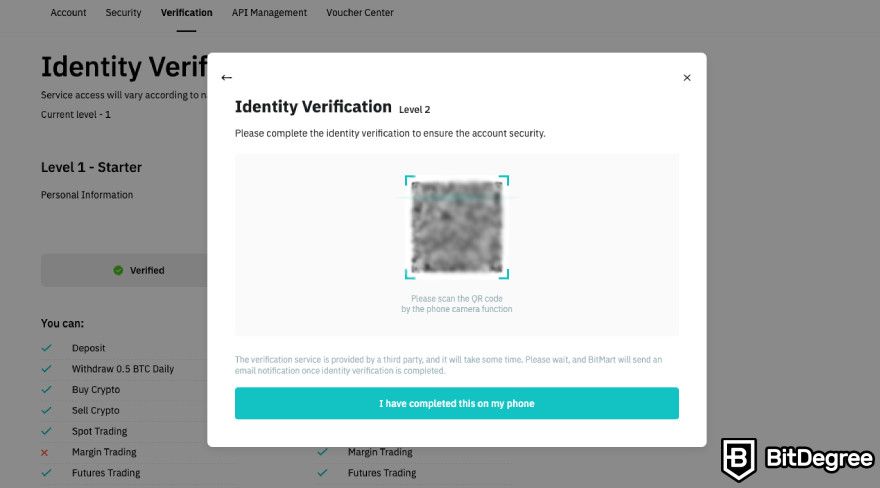
Step 3: The Advanced verification on BitMart is completed using a third-party service. So, you will be provided with a QR code, which you have to scan and complete the verification on your phone.
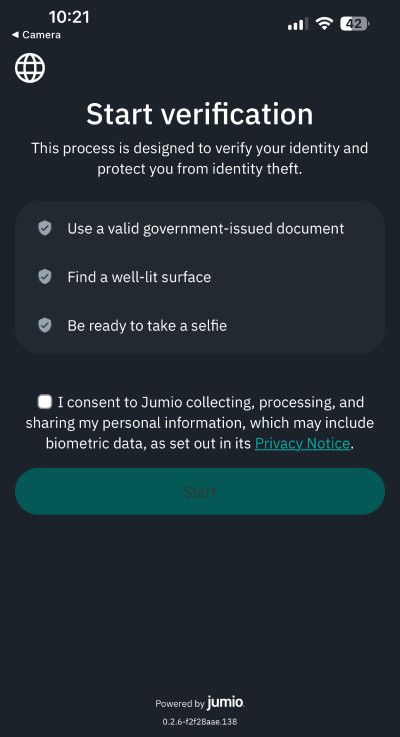
Step 4: Once you scan the code, you’ll be taken to Jumio. There, you’ll need to provide a government-issued ID and take a selfie to prove your identity.
Step 5: After you verify your identity on Jumio, get back to BitMart and click the [I have completed this on my phone] button.
That’s it. BitMart has one of the easiest and fastest KYC verification processes, for sure.
How to Buy Crypto on BitMart?
Now that you have a verified account, you’ll need to have some crypto in it if you plan to explore how to use BitMart exchange’s trading or earning features. If you don’t own any crypto yet, you’ll have to buy some, and the fastest way to do that is via the “Buy & Sell” tool on BitMart.
Once you navigate to it, you’ll notice that it offers two options: P2P trading and third-party payment.
What is BitMart P2P trading? Well, it is a platform that allows you to buy/sell crypto from/to other users. However, the supported crypto selection is pretty limited.
So, the second option, which allows you to buy crypto quickly with fiat using third-party payment channels (over 300 are supported, which is A LOT!), is the one I’ll use in this guide. Of course, do note that payment provider availability will depend on your country of residence.
How to Buy on BitMart via Third-Party Payment Channels
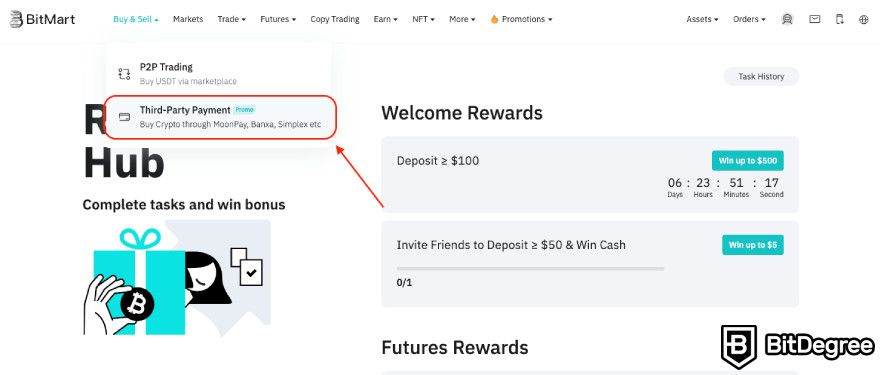
Step 1: Hover on the [Buy & Sell] button on the top right corner of the screen and click on [Third-Party Payment].
Step 2: Choose the asset you want to buy, the fiat currency you want to use to pay for it, and the amount you want to buy (or pay). Click [Buy BTC]. Notice that there are certain purchasing limits for each asset. For instance, you have to buy at least $30 worth of BTC.
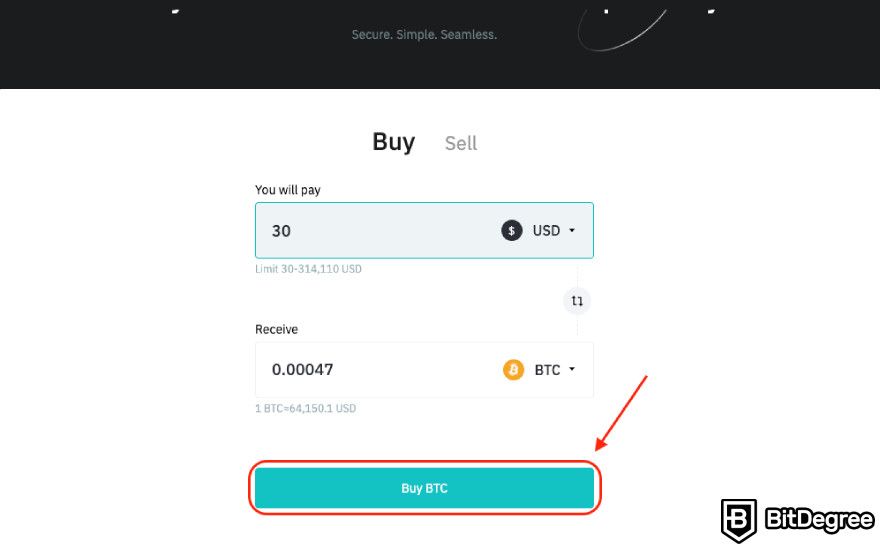
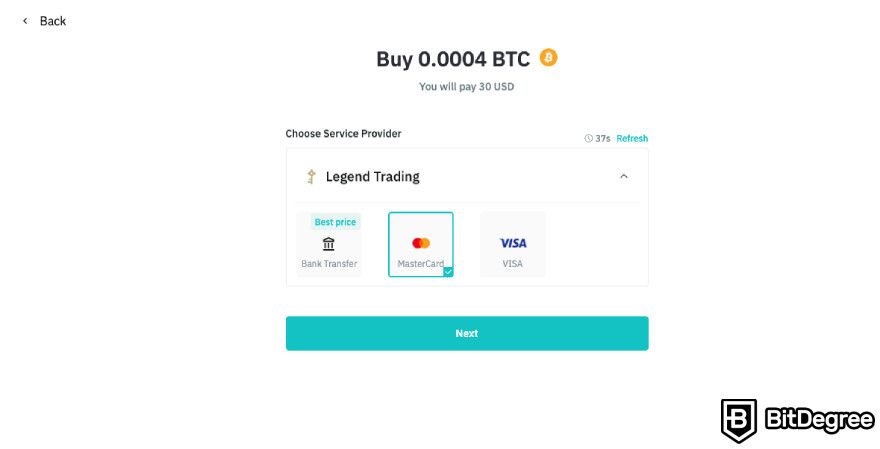
Step 3: Choose the payment provider you prefer. I, for example, bought crypto via Legend Trading using my MasterCard. Before I was taken to the payment channel, I was provided with a summary of my purchase.
Step 4: After I’ve revised the summary, I was taken to the payment provider. Though, I did not leave BitMart, I was taken to the Legend Trading plug-in, which is nice.
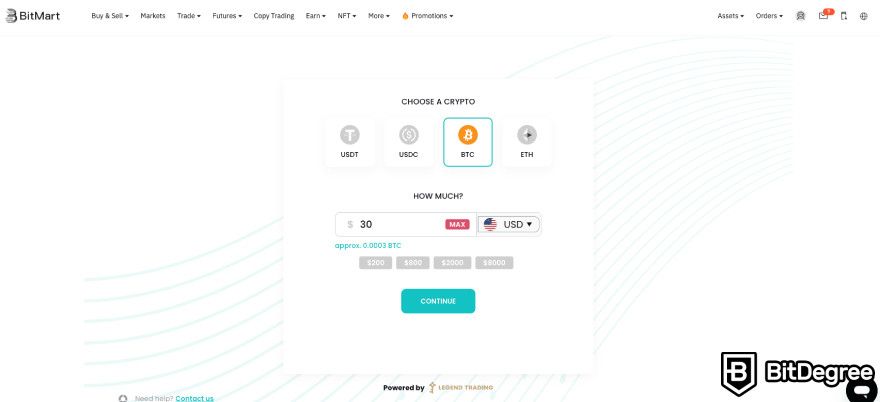
Here, I just had to fill out all the necessary details and proceed with the purchase. Once you do that, the crypto you bought will appear in your BitMart account. How fast, depends on your chosen purchasing method.
How to Deposit/Withdraw Crypto to/from Bitmart?
If you’re not looking for how to buy on BitMart because you already have some crypto on another exchange or wallet, you might want to know how to deposit it. Let's see!
How to Deposit Crypto to BitMart
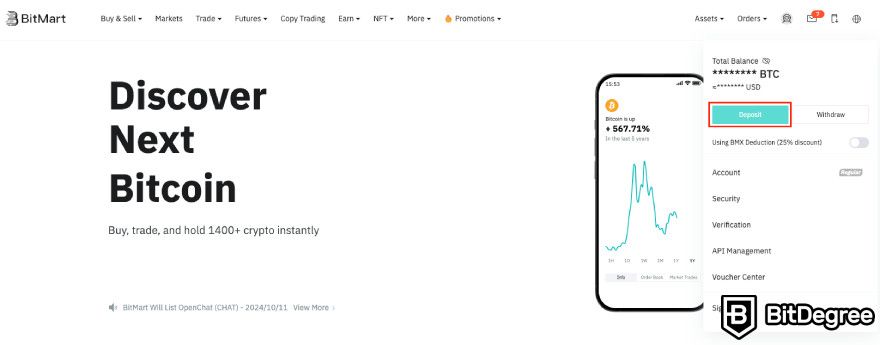
Step 1: Hover on your account icon and click [Deposit].
Step 2: Select the coin you want to deposit.
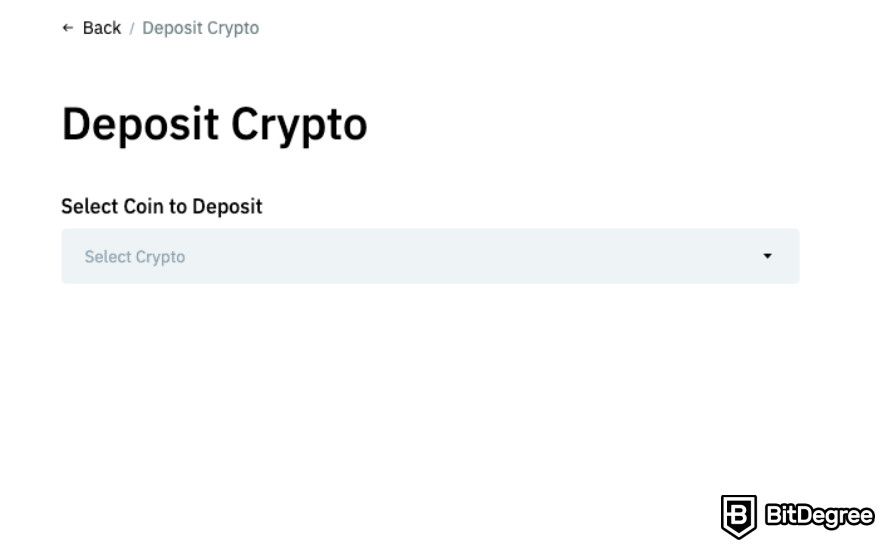
Step 3: Then, select the network you want to use (different networks might incur different fees), and your deposit address will be generated.
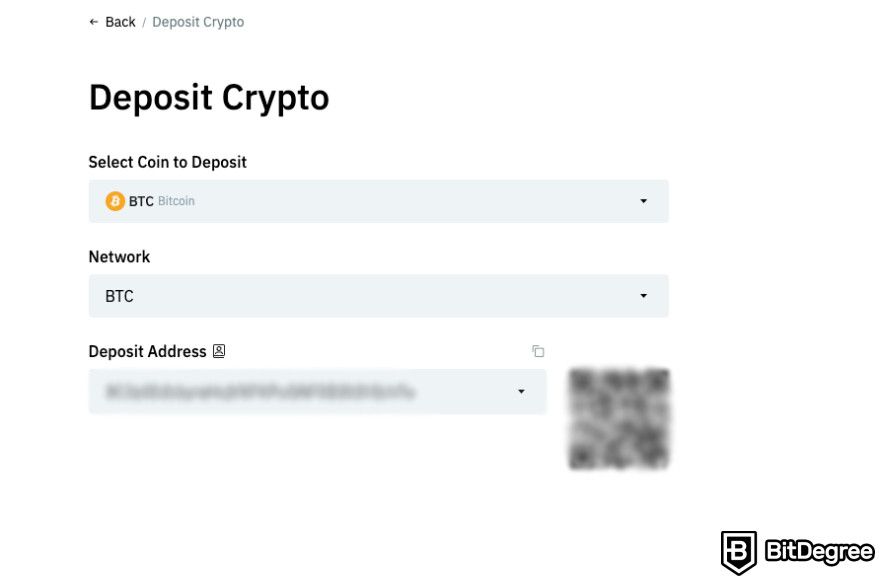
Step 4: Just copy that address and paste it into the wallet from which you want to deposit your crypto. Just be careful, make sure you’ve pasted the address correctly and chose the right network. As an alternative, you can use the QR code that was generated next to your address to complete the deposit.
How to Withdraw Crypto from BitMart
Now, since we’re on the topic of depositing, let’s also take a look at how to withdraw from BitMart (the process is pretty much the same).
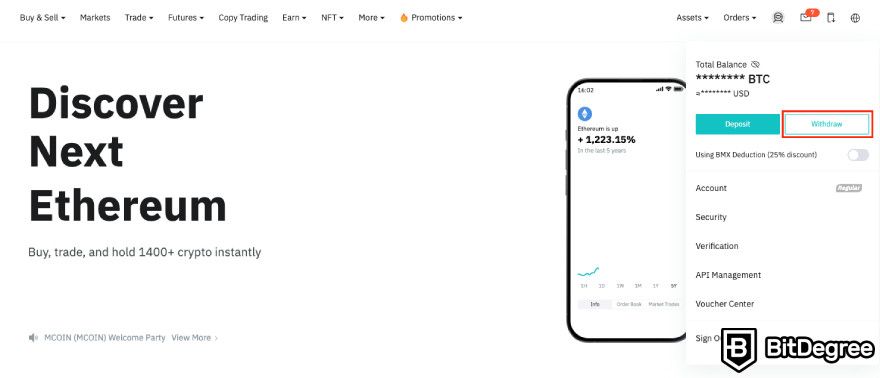
Step 1: Next to the [Deposit] button, there is also the [Withdraw] button. Click on it.
Step 2: Select the asset you want to withdraw.
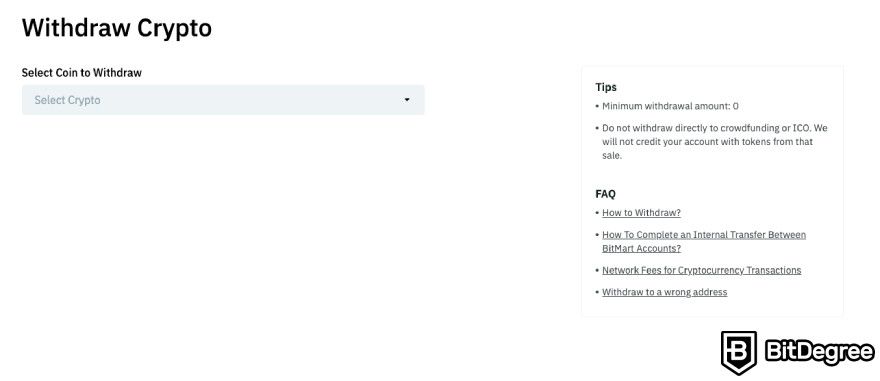
Step 3: After that, you’ll also have to select the network you want to use, and you’ll get your withdrawal address (+ the QR code). Copy the withdrawal address and paste it into the wallet to which you want to withdraw.
By the way, you can check BitMart withdrawal fees for each asset on their website beforehand. This could help you choose a more cost-efficient network for withdrawing.
That’s it, once you do all that, you’re funds will be withdrawn from BitMart to your chosen wallet. Speaking of wallets, for extra security of your assets, consider getting a cold wallet like Ledger Nano X or Trezor Safe 5, especially if you're thinking about long-term hodling.
Trading on BitMart
Can you say that you know how to use the BitMart exchange after signing up, passing KYC, and getting some crypto? Yes and no. You know the basics, but you really learn how to use the platform when you try out its trading features. That said, BitMart offers a wide variety of trading options, including:
- Spot trading
- Margin trading
- Futures trading
- Copy trading
- NFT trading
So, no matter what is your crypto trading skill level, you’ll find what you’re searching for on BitMart.
Below, I’ll only provide you with step-by-step guides on spot, margin, and futures trading on BitMart. However, if you want to participate in futures trading but are not sure what strategy to employ, you can try out futures copy trading.
What is BitMart's copy trading? Well, just like the name suggests, it allows you to copy the trading strategies of other traders. The process of doing that is really straightforward, so I'm pretty sure you won't need a guide. Of course, be careful with copy trading; you’ll be putting the fate of your funds in another trader's hands, after all.
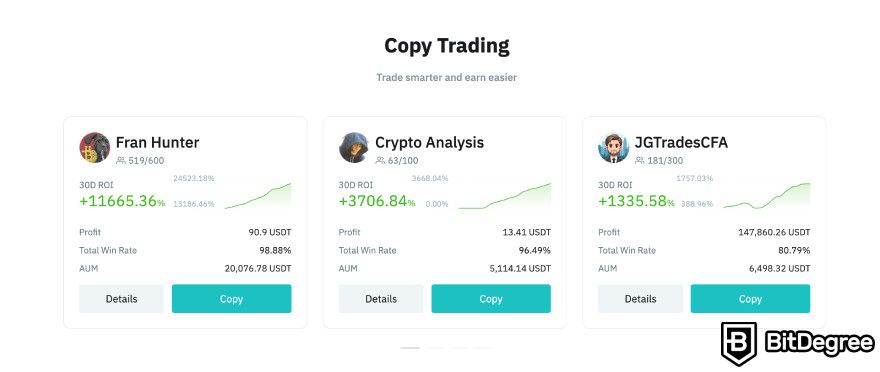
As for NFT trading, BitMart has an NFT marketplace where you can buy or sell NFTs. The process is pretty standard, too, so you shouldn’t face any issues. If you do, the exchange offers 24/7 customer support and comprehensive tutorials on using the platform (you can find those on the BitMart Academy).
Okay, time to get to the “how to use the BitMart exchange for trading” part.
Spot & Margin Trading
Spot trading is the most basic form of crypto trading. On the BitMart spot market, you can trade over 1,400 cryptocurrencies, which is a lot! However, your trading pair availability might depend on your country of residence (if you’re in the USA, you’ll be able to access a smaller number of crypto assets).
Now, I get it, if you’re a newbie, the trading interface might seem scary at first, but don’t judge a book by its cover; it’s actually easier to understand than it looks.
How to Use BitMart Exchange’s Spot Trading Interface
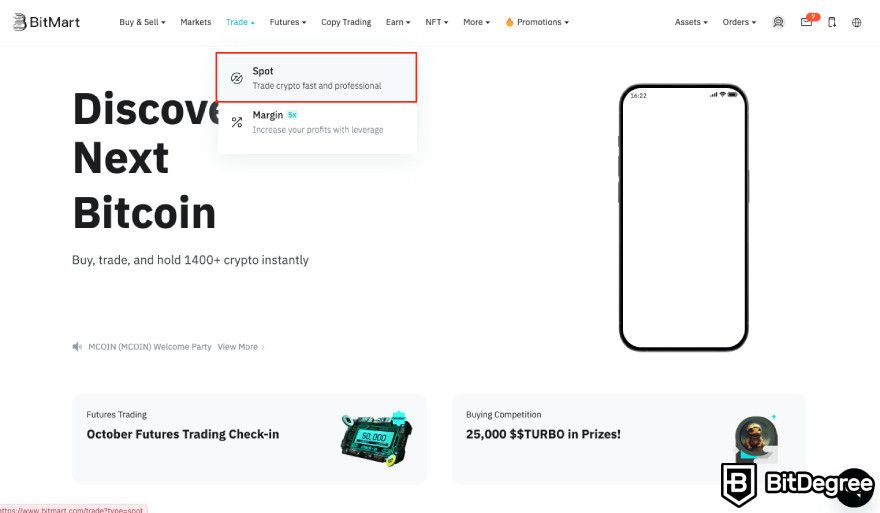
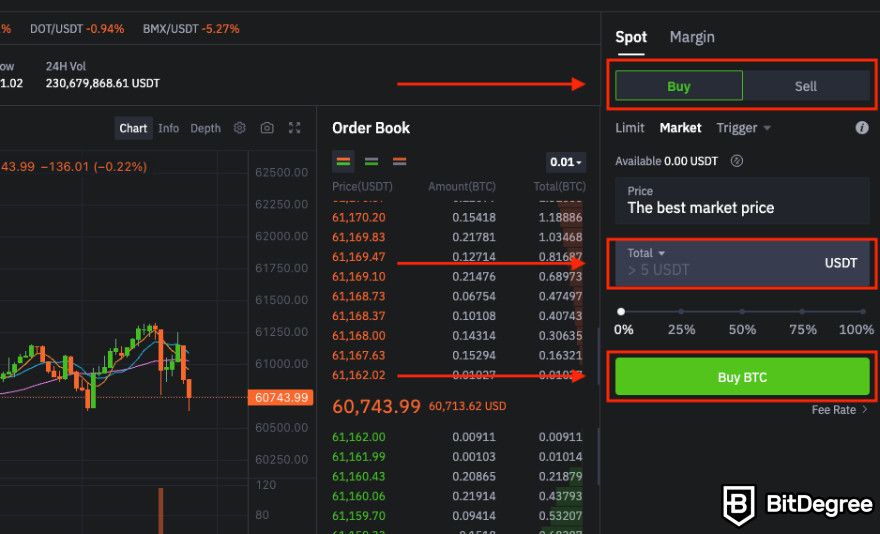
Step 1: Navigate to the [Trade] option on the navigation bar and click [Spot].
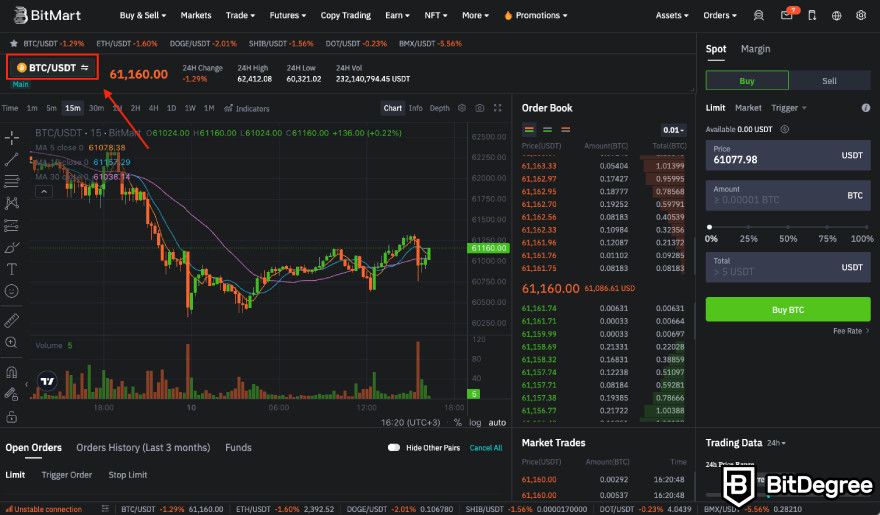
Step 2: On the top left corner of the screen, choose the trading pair you want to trade. Just click on it and you’ll be able to see which pairs are available. I went with BTC/USDT.
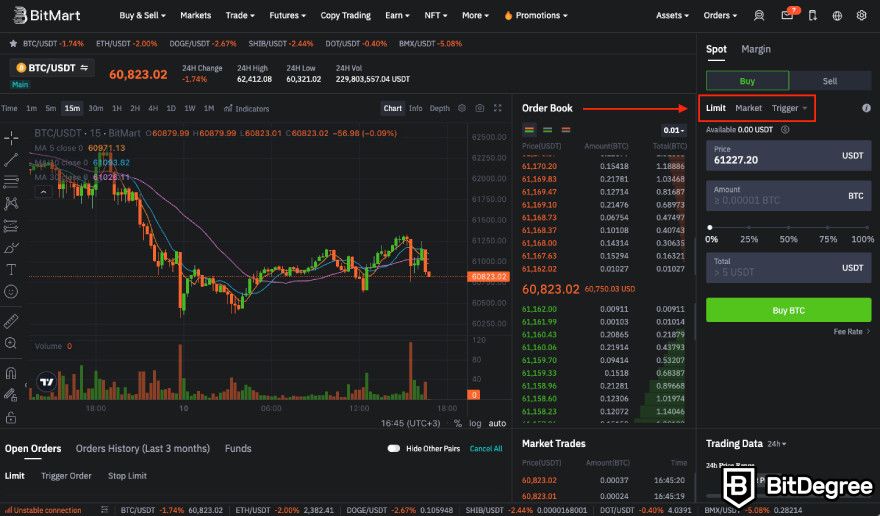
Step 3: Now, take a look at the right side of the screen. There, choose the type of order you want to make. You can choose from limit, market, and trigger orders. In this guide, I’ll use the market order, which provides the best market price currently.
Step 4: Select whether you want to buy or sell (in this case, buy if you want to get BTC and sell if you want to get USDT), fill in the amount, and click [Buy BTC]. That’s it!
Now, you might have noticed the “Margin” option next to “Spot” on the right side of the screen. Margin trading allows you to borrow funds to trade larger amounts of crypto than you own. By using leverage, you can amplify potential profits (but it also increases the risk of bigger losses if the trade goes against you, so be cautious).
BitMart allows 5x leverage for margin trading. Also, as of writing, it supports only isolated margin, but it will support cross margin in the future, too.
How to Use BitMart Exchange’s Margin Trading Interface
Step 1: Click on [Margin] in the spot trading interface or hover your mouse over [Trade] in the navigation bar and click on [Margin].
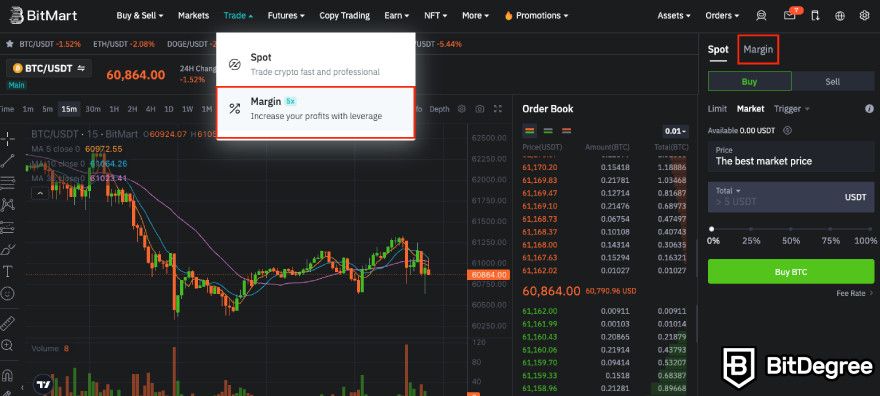
Step 2: At the top left corner of your screen, pick the trading pair you want to trade. I’ll stay with the same one – BTC/USDT.
Step 3: You’ll need to transfer some funds into your margin account from the spot account. So, if you haven’t deposited or bought any crypto yet, make sure to check my guide on how to buy on BitMart above.
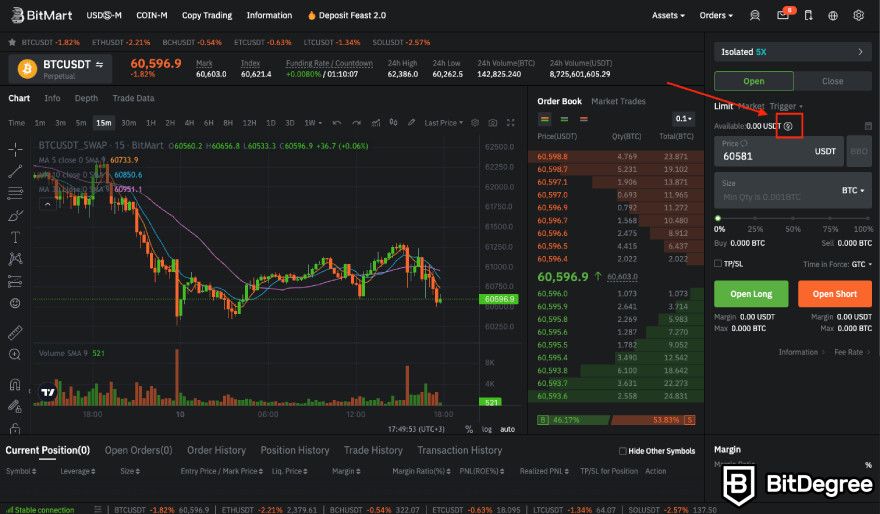
To transfer funds into the margin account, click on the little circle next to your available balance. Then, choose the assets and the amount you want to transfer and click [Confirm].
Step 4: Choose the order type (you can pick limit, market or advanced limit), I’ll go with the market order once more. Then, also choose the margin type (normal, borrow, or repay). Hover your mouse over the [i] button on the right to find explanations for those types.
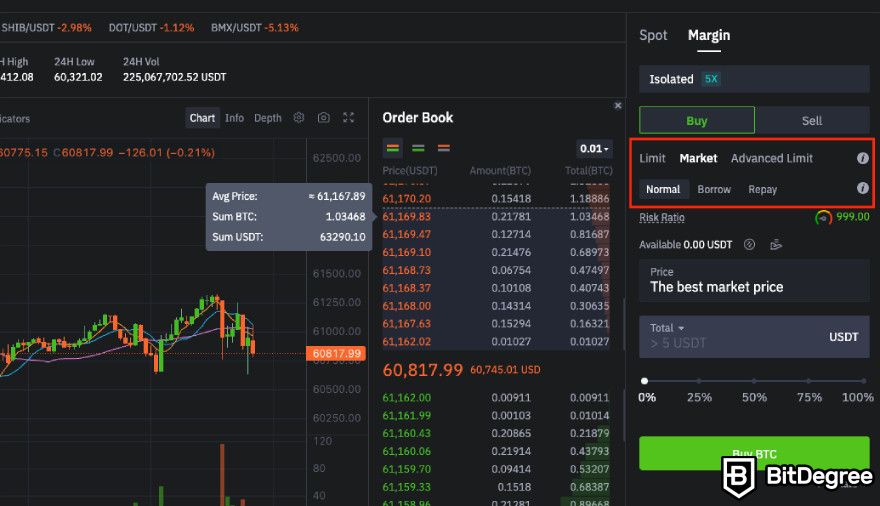
Step 5: Like in spot trading, choose whether you want to buy or sell, fill in the amount, and then click [Buy BTC].
This is a simplified explanation. If you want to know more details about how to use BitMart exchange’s margin trading, check out their tutorials.

- Secure and reliable
- Accepts fiat currencies
- Lots of trading options
- Reputable exchange
- Accepts fiat currencies
- Offers various trading options

- Huge trading variety
- Regulation-compliant around the globe
- Fair trading fees
- Beginner-friendly
- A wide array of features
- Vast number of different crypto coins & tokens

- Beginner-friendly
- Secure
- Decent trading and withdrawal fees
- Crypto.com Visa Card
- Automated tools & bots
- Ecosystem synergy with CRO
Futures Trading
BitMart’s futures market offers over 100 USDT- and coin-marginated perpetual futures contracts and supports up to 100x leverage.
Your futures trading experience on BitMart should be very smooth, with a latency of fewer than 5 milliseconds. This is made possible with the help of its powerful matching machine, which can run up to 100,000 orders per second.
How to Use BitMart Exchange’s Futures Trading Interface
Step 1: Hover your mouse over [Futures] on the navigation bar and pick the type of contract you want to trade. I went with USDⓈ-M, which essentially means contracts will be made of a stablecoin and a volatile cryptocurrency like BTC.
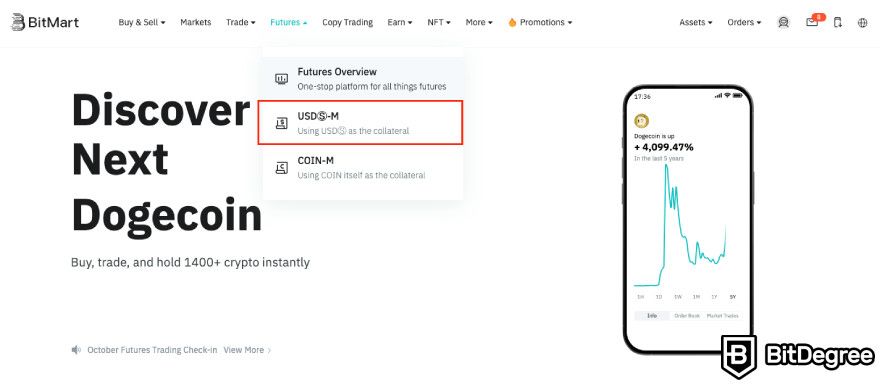
Once you enter the trading interface, BitMart’s futures risk disclosure notice will appear. Make sure to read it before accepting it.
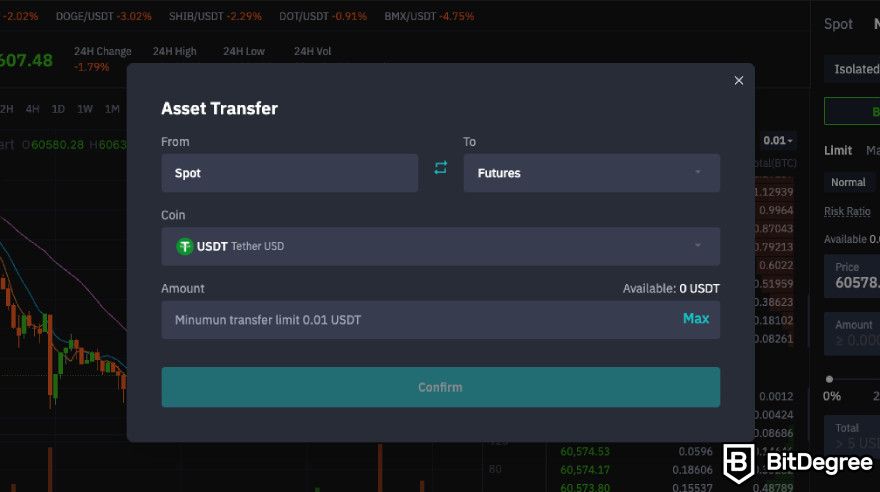
Step 2: Like with margin trading, you’ll need to transfer some funds into your futures account from the spot account. Again, click on the little circle next to your available balance, choose the asset you want to transfer, pick the amount, and click [Confirm].
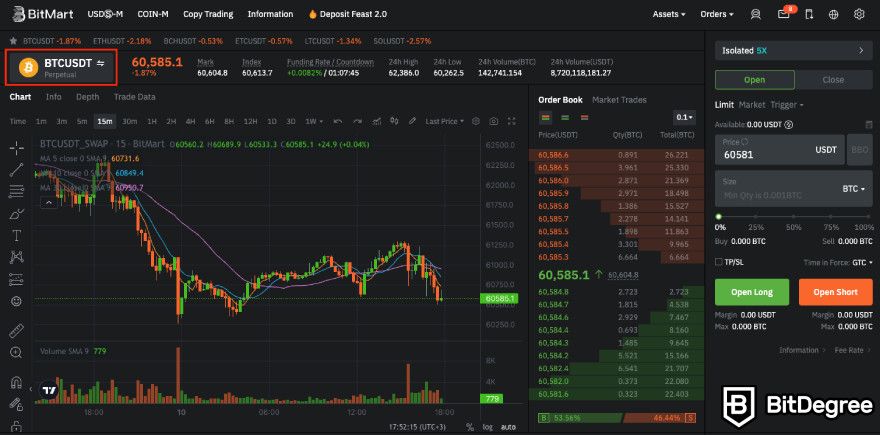
Step 3: Select the futures contract you want to trade. I went with BTCUSDT.
Step 4: Click on [Isolated 5x] to adjust leverage and margin mode. You can either choose cross or isolated margin and leverage up to 100x.
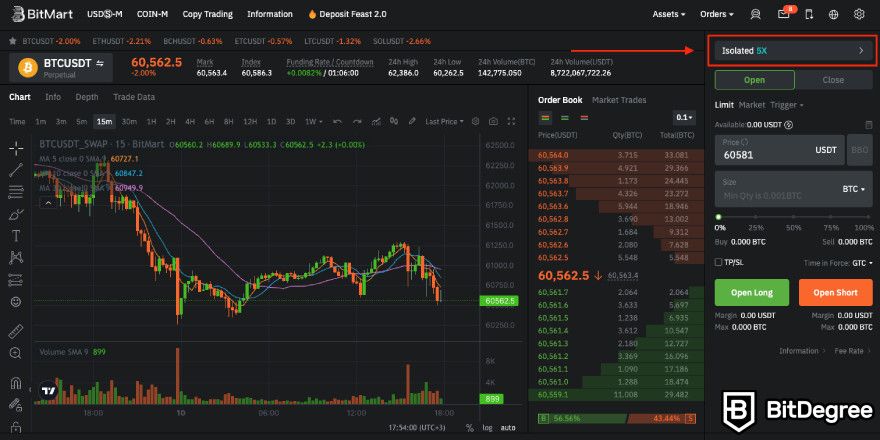
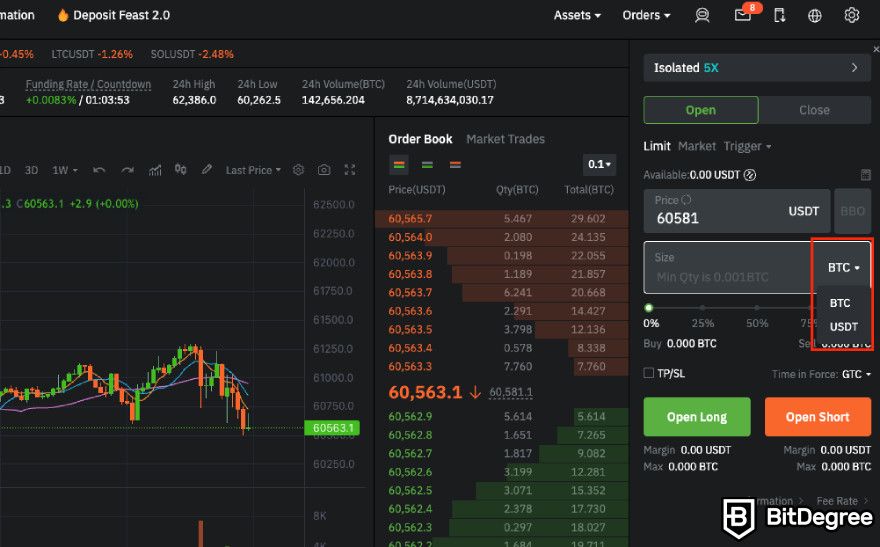
Step 5: Pick the trading unit (in my case, I can pick either BTC or USDT) and then enter the price and quantity.
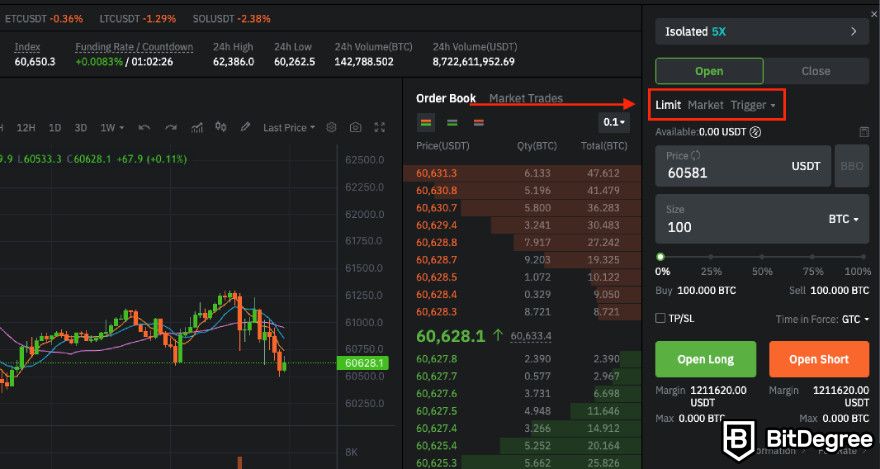
Step 6: Pick the order type (limit, market, or trigger).
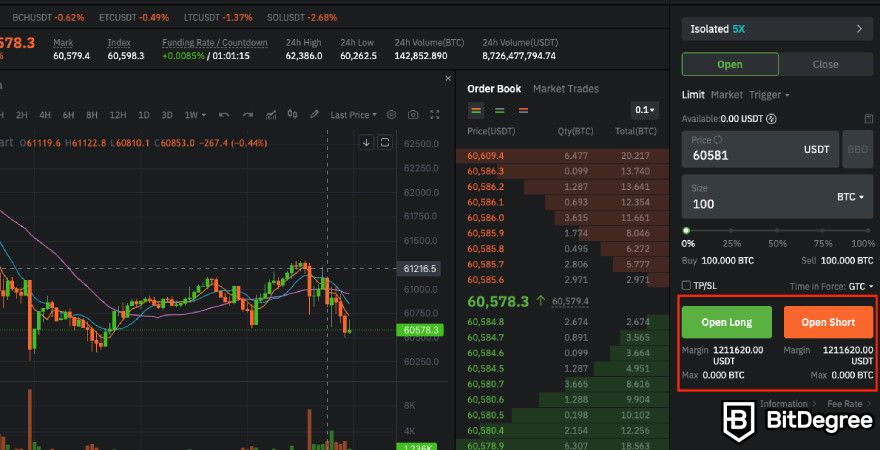
Step 7: Open a position. You can either go long or short. Once you open it, you can see it at the bottom of the futures trading interface (alongside all your previous positions).
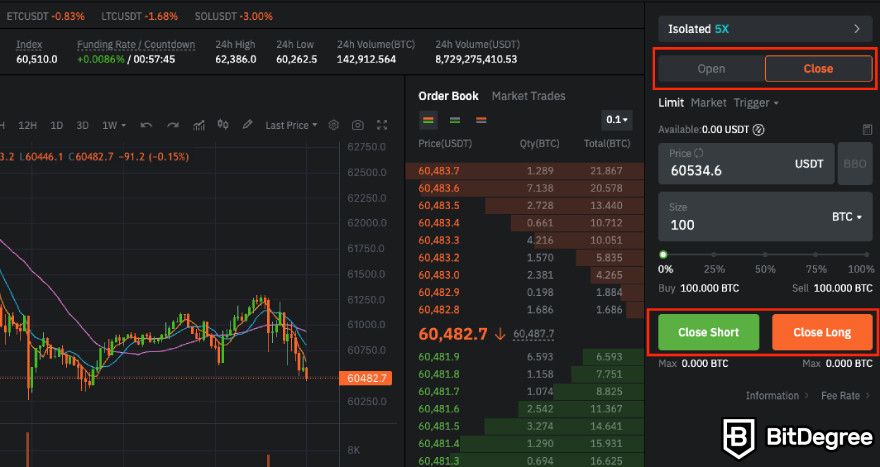
Step 8: Close a position. Fill in the price and quantity you want to order, and then pick either a short or long close position.
If you’re feeling a bit overwhelmed right now and need more in-depth explanations of all these aspects, don't worry, you’ll find them on the BitMart Academy!
Earning on BitMart
Now that you’re familiar with how to use the BitMart exchange for trading, note that you can also use it for earning (and it actually offers various ways to do so).
The first one is BitMart Earn, where you can grow your crypto using various mechanisms, including BitMart staking, savings, dual investment, VIP wealth management, and ETH 2.0 staking. These options support a range of cryptocurrencies, with APYs from 0.3% to over 171.55%, depending on the method and asset.
It’s pretty easy to use those tools. For example, here is how to use BitMart staking:
Step 1: Hover your mouse over [Earn] and click on [Staking].
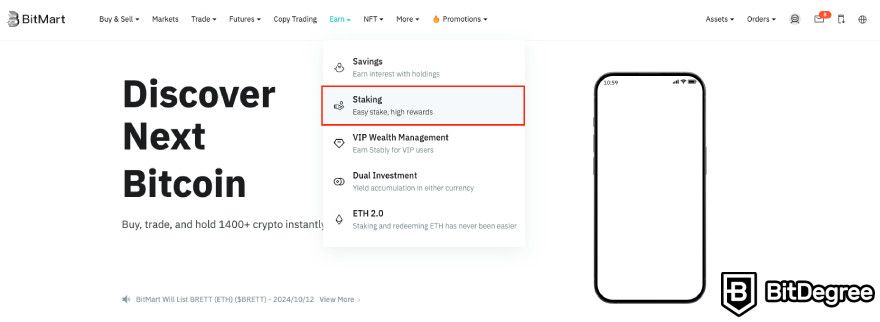
Step 2: Choose the asset you want to stake. Next to each one, you’ll see all the important information, like the minimum staking amount, APY, and possible duration. In this BitMart staking guide, I’ll go with ETH.
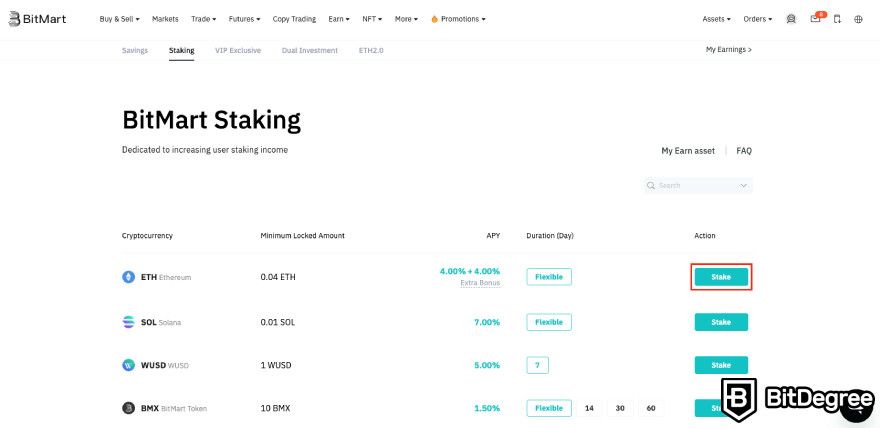
What does that “4.00% + 4.00%” APY mean? Well, as of writing, there’s an event taking place, during which you can get futures rebate cards. So, that “+ 4%” means that in addition to the interest on the product, I’ll also get a futures rebate card, which will have the same value as the interest I’ll earn. These events are limited-time, so always be on the lookout.
Step 3: Enter the amount you want to stake, read and agree to the User Agreement, and click [Stake].
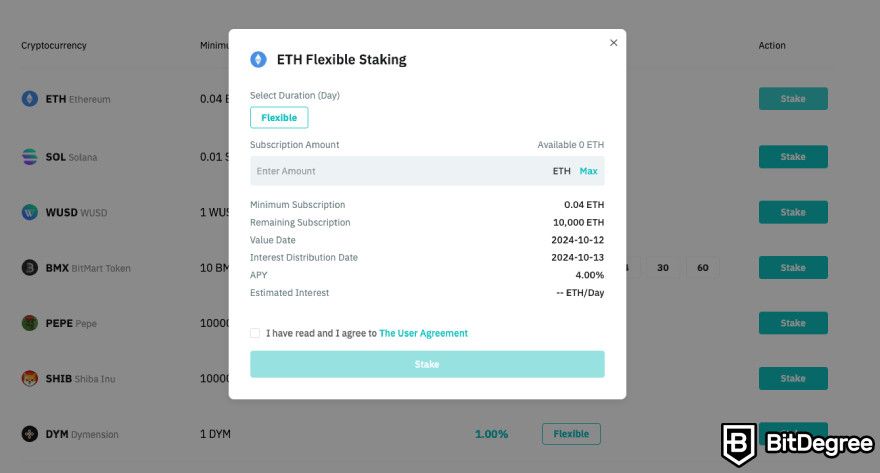
See? Very easy. Obviously, you do have to have the asset you want to stake in your account already. If you don’t, refer to the “How to buy on Bitmart” guide above.
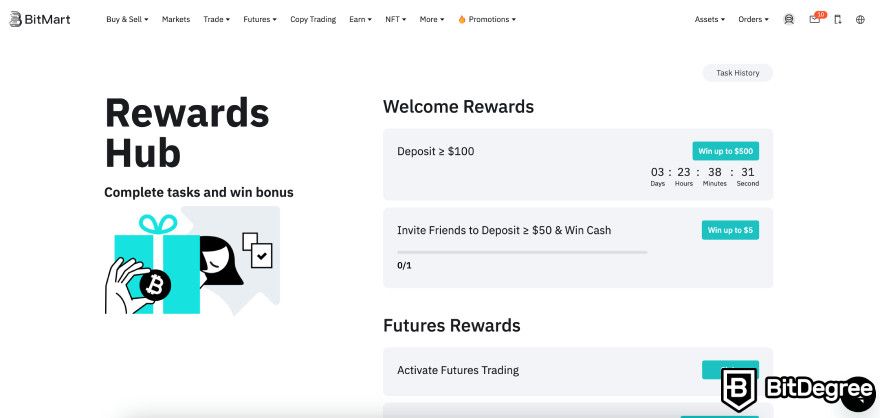
Now, the Rewards Hub is another way to earn, where you can earn by completing simple tasks such as signing up, inviting friends, or participating in trading activities. Rewards vary by task and can include bonuses like spot and futures trading fee vouchers, with some tasks offering up to $500. Just keep in mind that these bonuses must be used within 3 months, or else they'll expire.
BitMart also has a Referral Program, which lets you earn a 30% commission from your friends' trading fees when you invite them to join the platform. Additionally, you can earn an extra 10% commission from the activity of friends they invite. However, the commission period is limited to one year, so you'll need to keep inviting new friends to continue earning long-term rewards.
On top of that, there are various promotions available on BitMart (like the one I mentioned when I talked about BitMart staking). They provide you with even more ways to earn.
Besides all the trading and earning features, BitMart also offers an NFT and crypto asset Launchpad; you can find more information about it in this BitMart review.
Conclusions
Congratulations! You're fully equipped with all the key information on how to use the BitMart exchange, and I’m sure you'll agree it’s very user-friendly.
The only challenges you might face could come from unfamiliarity with certain trading strategies, but you can always turn to BitDegree's in-depth tutorials for help. Additionally, BitMart Academy provides valuable resources, especially if you're looking to explore features we didn't cover in-depth, like the BitMart Launchpad.
With these tools at your disposal, you're all set to start your BitMart trading journey!
The content published on this website is not aimed to give any kind of financial, investment, trading, or any other form of advice. BitDegree.org does not endorse or suggest you to buy, sell or hold any kind of cryptocurrency. Before making financial investment decisions, do consult your financial advisor.
Scientific References
1. F. Emmert: 'The Regulation of Cryptocurrencies in the United States of America';
2. P. P. Rajapurohit, N. Bhaskar, P. Kumaa, et al: 'Enhancing KYC Verification: A Secure and Efficient Approach Utilizing Blockchain Technology'.
