Ace quick missions & earn crypto rewards while gaining real-world Web3 skills. Participate Now ! 🔥
If you’re coming into this tutorial from my Vertex Protocol review, you’re probably already familiar with the unique take on decentralized crypto exchanges that Vertex is. Granted that the platform is still currently in its testnet phase, and is yet to be launched on the Arbitrum mainnet, multiple people are looking at how to use Vertex Protocol, and all of its associated features.
Well - that’s exactly what we’ll cover in the article ahead!
Vertex can appear to be rather intimidating to start using, mostly due to the seemingly complex nature of the projects itself. The truth of the matter, though, is that the project aims to streamline the user experience as much as possible, and make DEXs - and, by that extent, DeFi, as a whole - more accessible to beginner crypto enthusiasts.
Note that while we’ll be covering the Vertex testnet, most of what we’ll talk about will very likely apply to the live product, when it’s finally fully launched. So, if you learn how to use Vertex Protocol right now, you’ll have an edge over many other enthusiasts, straight from the get-go!

Did you know?
Subscribe - We publish new crypto explainer videos every week!
Layer 2 Scaling Solutions Explained With Animations

Table of Contents
Before We Start Exploring Vertex
Now, before we jump into the actual topic of how to use Vertex Protocol, there are a few prerequisite requirements that you need to cover.
Latest Deal Active Right Now:For a limited time only, get Top-rated Ledger bundles for yourself and your loved ones with a 10% Ledger discount code. Take advantage of this valuable Ledger deal NOW!
Well, perhaps “need” is a strong word - instead, there are a few concepts that you need to familiarize yourself with, in order to better understand Vertex, as well as the services that it offers. This section is mostly oriented towards crypto industry newbies - if you’re an advanced-level trader, or simply a knowledgeable enthusiast, you can skip ahead to the "Funding Your Wallet" section.
First and foremost, you should look into decentralized cryptocurrency exchanges. This is kind of the backbone on which Vertex is built - it being a DEX itself, Vertex shares a large number of features with other, more “traditional” decentralized exchanges.
Having said that, once you become familiar with how other DEXs work, and how the trading process takes place on these platforms, you’ll develop a new appreciation for what Vertex is trying to do - namely, the improvement of user experience (by utilizing a CEX-like model) that the platform employs.

|

|
|
|---|---|---|
| Hardware | Software | |
| Safely Storing, Sending, and Receiving Different Cryptocurrencies | Best for Storing Small Amounts of Cryptocurrency | |
| All Ledger Nano X Coupons | See All Coupons of Best Wallets | |
| One of the best hardware cryptocurrency wallets ever made. | An attention-worthy hot wallet for Ethereum, but there are better options around. | |
|
Visit site
Read review |
See TOP10 Brands
Read review |
Table: Some general information about the MetaMask and Ledger Nano X cryptocurrency wallets
This part of your “research” should include navigating through all of the main features that DEXs have to offer to their users - try out the trading interfaces, check the available graphs, try to perform a trade yourself, from start to finish, and see how the whole process looks. This way, you’ll be able to compare and contrast!
Next, something that you should definitely do is create a cryptocurrency wallet. You will use this wallet to connect to the Vertex testnet, as well as the actual DEX, when it launches fully.
There are a few different wallets that you could create, but if you don’t have any super-specific preferences, I would recommend going with MetaMask. It’s one of the most popular hot crypto wallets on the market, and is both very quick to install, as well as very simple to navigate through and use.
Naturally, if you choose to later fund the wallet, it’s highly recommended that you connect it with a hardware device, such as the Ledger Nano X. This, however, is a topic for an entirely separate article.
Funding Your Wallet
The final bit of preparation that you’ll need to do, in order to be able to start checking out Vertex, is fund your crypto wallet with Arbitrum-friendly, testnet-exclusive cryptocurrency assets.
Admittedly, that might sound like an intimidating process that involves a lot of different steps, and a proper knowledgebase of crypto, as a whole. That being said, allow me to reassure you - while it might take some time to do, it’s nothing that you’d need to worry about. Just to prove my point further, I’ll guide you through the entire process!
The very first step is to change the network on your wallet (for the sake of keeping things simple, I’ll assume that you’re using MetaMask). You need to do this simply due to the fact that, by default, you’ll be on the main Ethereum network. This won’t do, since you won’t be transacting actual, real ETH coins, but will instead be using a test version of the asset.
This, in turn, means that you need to be on a dedicated test network in order to do so. Makes sense!
Adding a new network is pretty simple - go to your MetaMask wallet, and click on “Ethereum Mainnet”. On the popup that appears, click “Add network”.
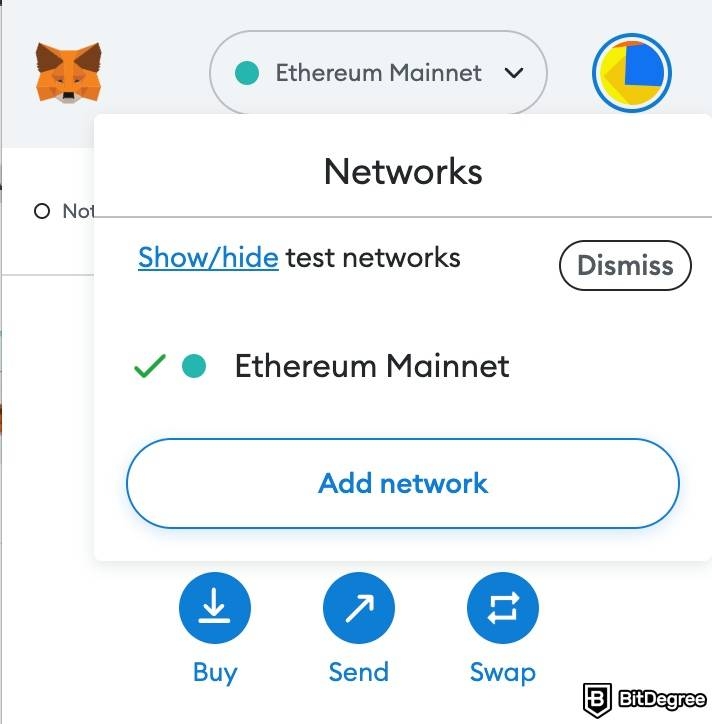
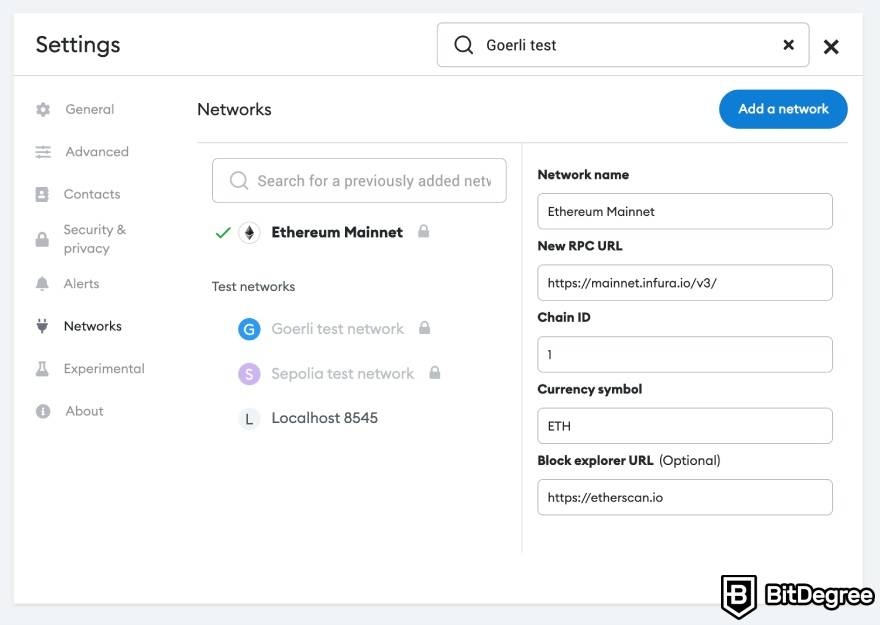
By default, if you’ve never tinkered with your wallet before, you probably won’t be able to see the Goerli test network on the list that pops up. Thus, go to your advanced settings, and when you scroll all the way down, you’ll see a feature of finding test networks - make sure it’s enabled.
Then, go back to the “Network” tab, click on the search bar, and type in “Goerli”. The network will pop up, and once you add it, simply go back to the main MetaMask page, and switch the network by clicking on the network selection tab at the top-right corner of the wallet.
Next, you will need to create an account on Alchemy - a Web 3.0 development platform. Do so, and once you have created it, navigate to the Goerli Faucet.
Here, you should see this screen:
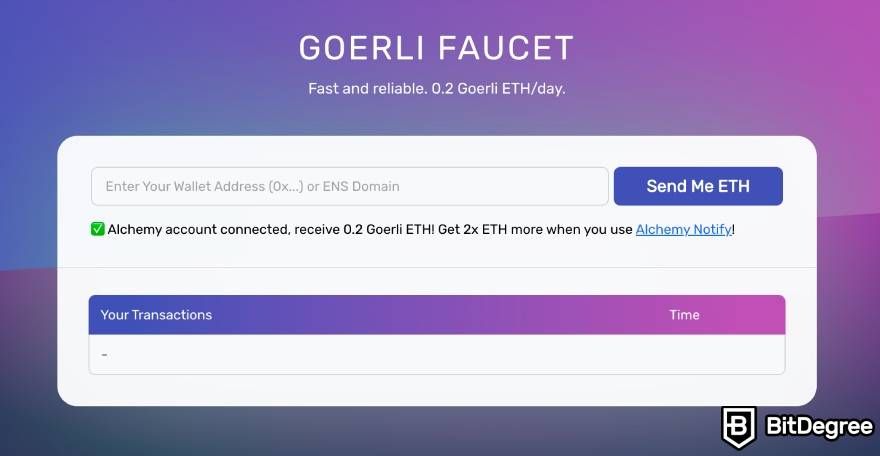
All that you need to do now is paste your wallet address, and click “Send Me ETH”. If you’ve followed the process up to this point in time, and have already changed your network on MetaMask, the testnet-exclusive ETH should appear on your MetaMask shortly.
So, up to this point, you’ve changed your network and got some testing-purpose ETH. Next up, you will need to navigate to the Arbitrum Bridge, and bridge your GoerliETH to Arbitrum Goerli. Since your wallet is already on the required network, all you need to do is connect it to the website, and enter the amount of GoerliETH that you want to bridge.
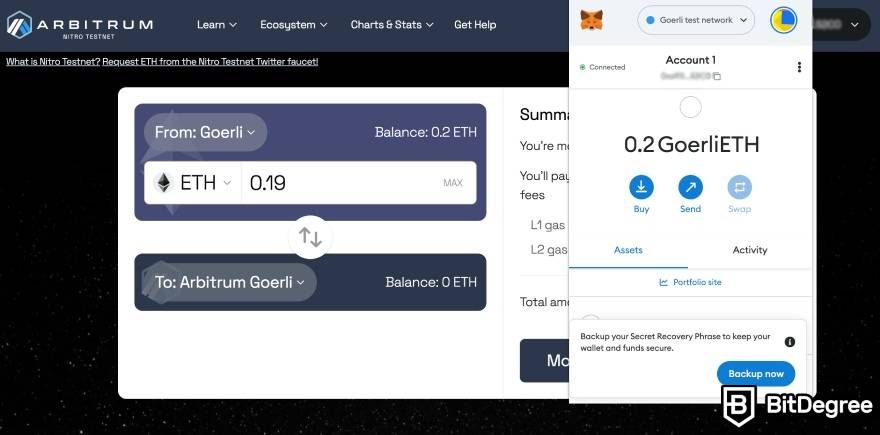
It sounds a bit convoluted, but is actually super-simple, and the end result should look like this:
The entire process of the token transfer will take approximately 15 minutes to complete. Once it’s done, you’ll be ready to move on with the question of how to use Vertex Protocol, and navigate to the platform itself.

Here, click on “Launch Testnet”, and on the page that pops up, click on “Connect Wallet”, at the top-right corner of the screen. Once the wallet is connected, you will need to navigate to the Vertex Faucet - you can find it at the lower-left part of the page.
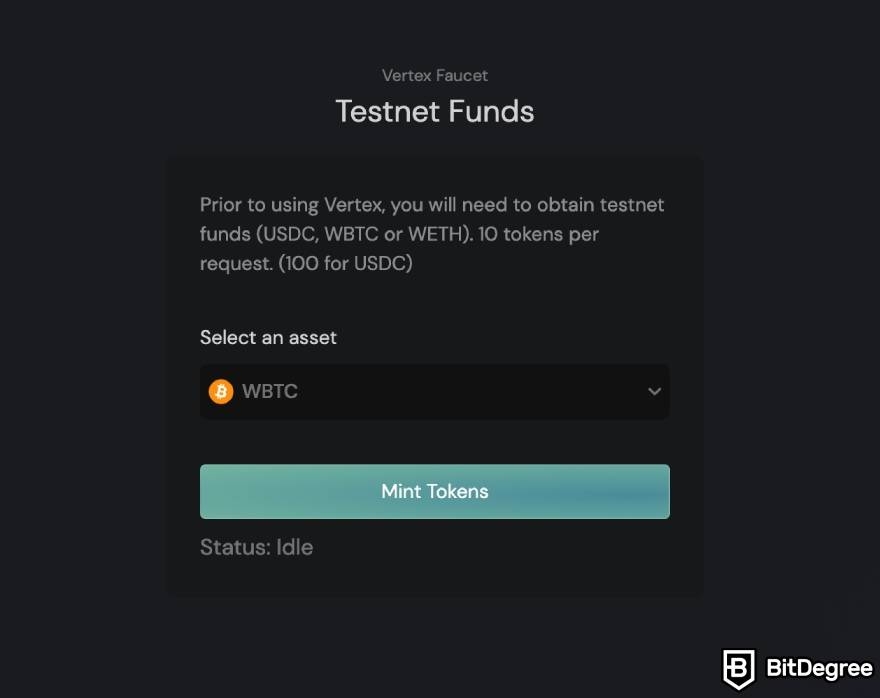
On the faucet page, select “USDC” from the dropdown menu, and click “Mint Tokens”. You will be asked to switch your network - confirm this. After a few seconds and on-chain confirmations, you should receive 100 testnet-USDC into your wallet.
With all of that accomplished, all that’s left to do is to deposit that 100 USDC into Vertex. You can do so simply by going to the “Overview” section of your dashboard, and clicking on “Deposit”. Pass a few confirmations, wait a couple of seconds, and that’s it - your account is credited, and you’ve got the most time-consuming part of how to use Vertex Protocol out of the way! Congratulations!
How to Use Vertex Protocol: Trades, Deposits, and Withdrawals
Whether you’re interested in the Vertex testnet, or are curious to learn how to use Vertex Protocol for future reference, chances are that the first things that you’ll need to look into will have to do with trading on, depositing to, and withdrawing crypto from the platform.
So - let’s take a look at how you can perform all of these aforementioned actions, on the Vertex testnet. First, however, you should be a little bit acquainted with the dashboard itself.
Assuming that you’re in your “Overview” tab, this is essentially where all of the most important information regarding your account can be found - your balances, liabilities, account health, and so on.
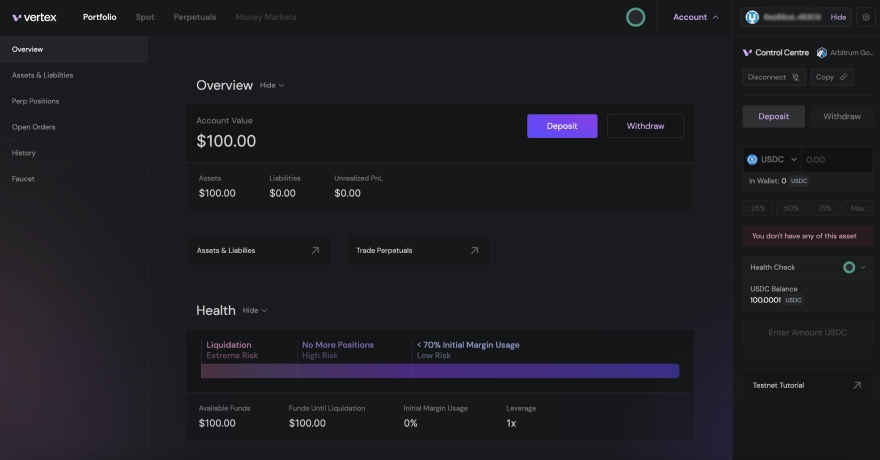
On the left side, you may also check your open orders, trading history, and some additional important information. The trading interfaces will be located on the top menu bar, while you can customize your settings and find useful information on the menu on the right.
Now, then - the very first thing that you’ll want to do is deposit some crypto. We did already do this earlier in the “How to Use Vertex Protocol?” tutorial; however, that process was somewhat testnet-exclusive, and you wouldn’t need to go through it on the final (launched) version of the platform.
Instead, if you’re reading this when Vertex *is* already live and running, deposits are going to be much simpler - you need to click on the “Deposit” button at the center of the page, in the “Overview” tab, or on the right-side menu of the screen. A popup like this will appear:
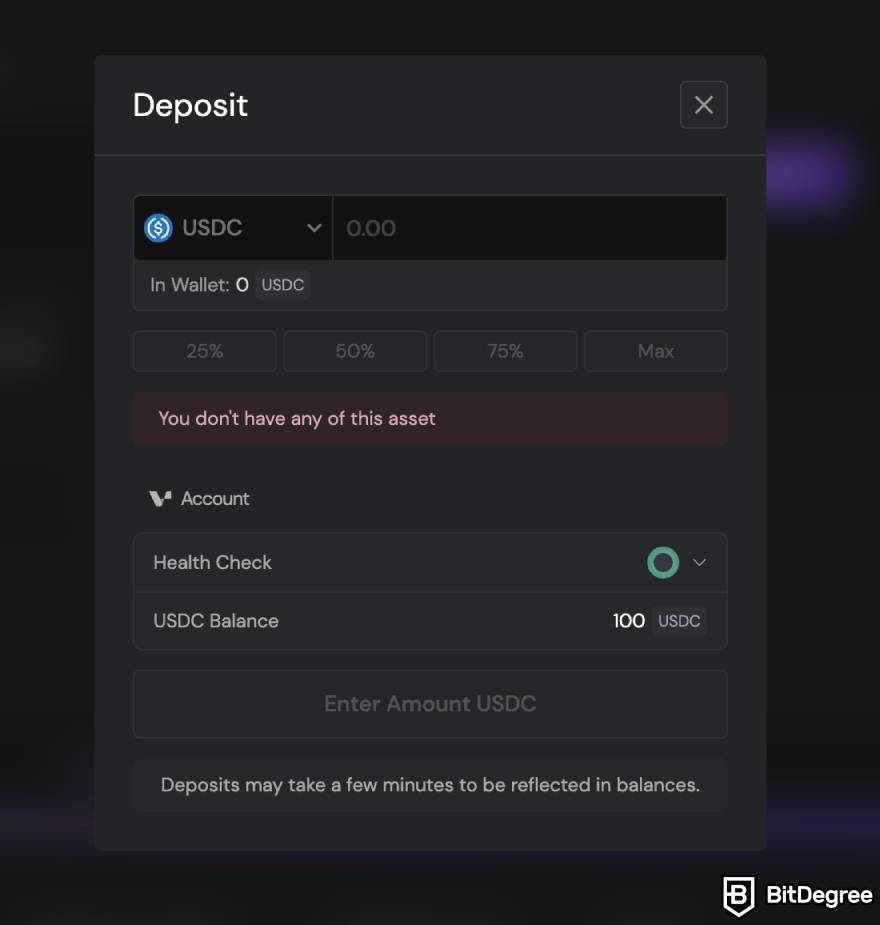
Here, you would simply need to enter all of the required information, and decide on the amount of crypto that you’d like to deposit. Once done, pass the usual confirmations, and your account should be credited shortly, assuming that you have enough funds in your dedicated wallet.
On the same note, withdrawals work in a very similar fashion - we don’t really need to dedicate a separate section of this “How to Use Vertex Protocol?” article to discuss this particular process. Instead of clicking on “Deposit”, you would click “Withdraw”, and follow the provided instructions - they’re rather self-explanatory.
That being said, it’s worth mentioning that Vertex does have crypto borrowing and lending functionality - this, in turn, means that you can borrow assets from the DEX. It would be done via the withdrawal interface, by selecting “Borrow Assets”.
What this means is that, essentially, you will be able to withdraw specific crypto assets that you don’t own, using your deposited cryptos as collateral. Granted that lending & borrowing is one of the main features of Vertex, in general, this can definitely prove to be useful, in certain situations!
Navigating the Vertex Trading Interface
With deposits and withdrawals covered, the next step in this tutorial on how to use Vertex Protocol is to check out the trading interface, and get familiar with it.
In order to navigate to the interface in question, you can go to either “Spot” or “Perpetuals” tabs, at the top-side menu on your dashboard. While the interfaces are going to be a bit different, their functionality will essentially remain the same - for the sake of consistency, I’ll start off with the Spot market interface as the main example, for the time being.

If you have traded crypto on any centralized exchange before, the view that you see in front of you is likely quite familiar. In the center, you have your asset price graph, as well as the order book on the left side.
On the far-left part of the page, this is where you’ll be executing your trades - it’s the main section containing all of the relevant information that you’ll need to fill out before placing a trade. This includes whether or not it’s going to be a leveraged trade, if it’s a Limit or a Market order (the former will allow you to set a limiting price, while the latter will execute the trade immediately), how much you’d like to trade, and so on.
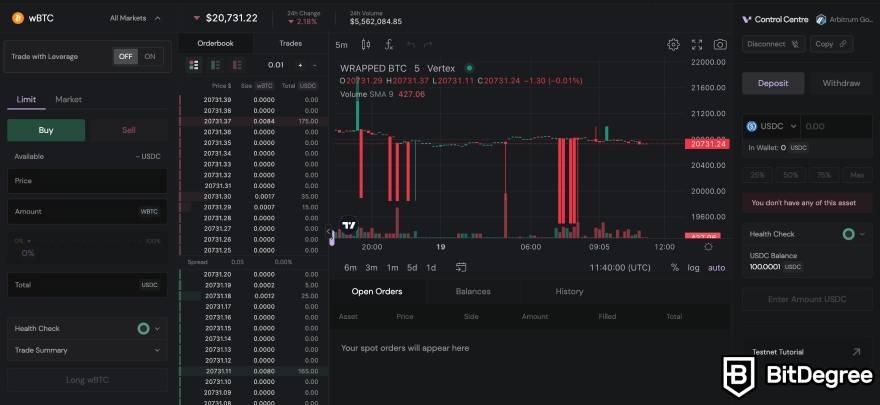
At the bottom of the page, you will also be able to view your open orders, balances, and transaction history. Truth be told, the functionality is pretty standard, and similar to most other trading interfaces that you might come across!
Moving on from the Spot trading interface that Vertex employs, let’s also briefly check out the interface that you’d utilize if you were to trade perpetuals on the exchange.
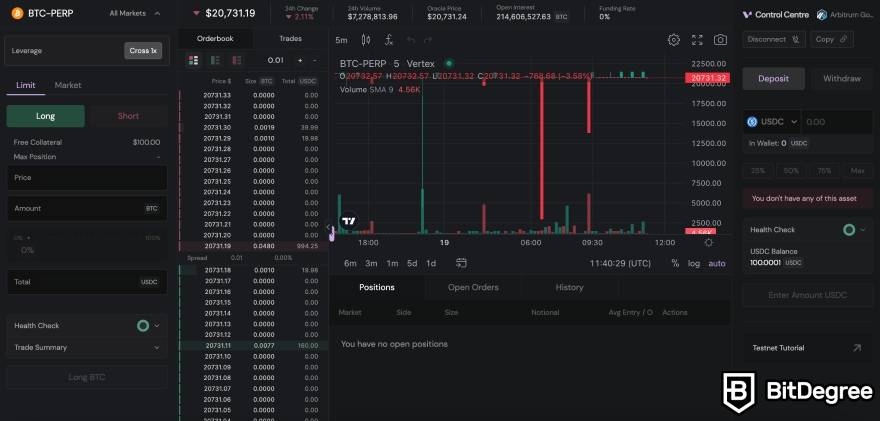
As you can see, the general view is the same, with only a few service-specific features being different. You can choose to go either long (price will rise) or short (price will fall) on the asset that you want to trade, as well as customize other properties related to the actual trade (collateral, order type, and so on).
One more thing that you might notice both on the Perpetual, as well as the Spot interfaces, is the leverage feature, above your trade information section. Indeed - while it’s something that I’ve hinted at in my Vertex review, the platform does also offer leveraged trading, assuming that your account meets the requirements associated with it.
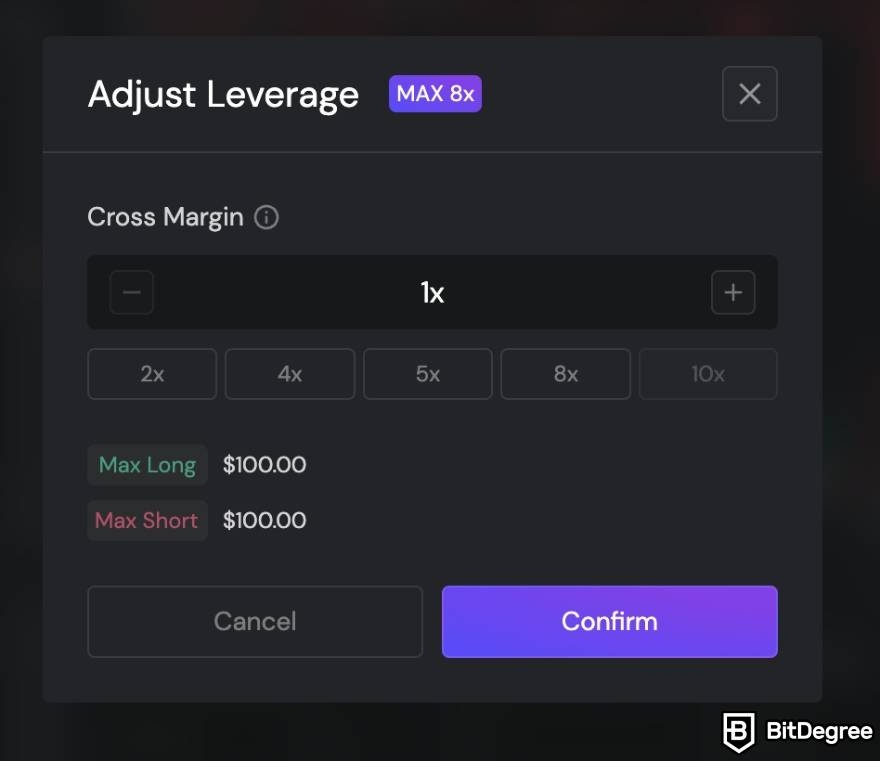
With Vertex, you can go up to 40x leverage trades, granted that you have the collateral to cover it. While trading with leverage might not be everyone’s cup of tea, and is usually associated with a huge amount of risk, it’s a feature that will definitely be appreciated by advanced-level traders!
Wrapping it up, the one big difference between the Vertex interfaces and many other, similar ones is that Vertex is a DEX - that’s something that you shouldn’t forget, all throughout this “How to Use Vertex Protocol?” tutorial! Whether it be the overall dashboard of the platform, or the trading interface, specifically, the project’s goal to streamline user experience really does show, when compared to its competitors!
Speaking of which…
Vertex VS Uniswap - Which One Should You Pick?
I’ve hinted at this in my Vertex review, but it really is no secret that, with time, the number of decentralized exchanges is only growing bigger and bigger. This, in turn, leads to more competition within the space - in a very general sense, that’s a good thing!
That being said, there are certain DEX “titans” that are very well-known within the industry, and that are usually seen as the go-to options for anyone looking to start trading crypto in a KYC-free manner. Chances are that, for most people, Uniswap is the platform that would immediately pop into their minds, when they hear this.
However, granted that you’re trying to learn how to use Vertex Protocol, or even how to buy VRTX coins (currently, as of writing this, that’s not possible to do), you’re probably aware of the value proposition offered by the platform in question, and how it aims to revolutionize the DEX industry, as a whole.
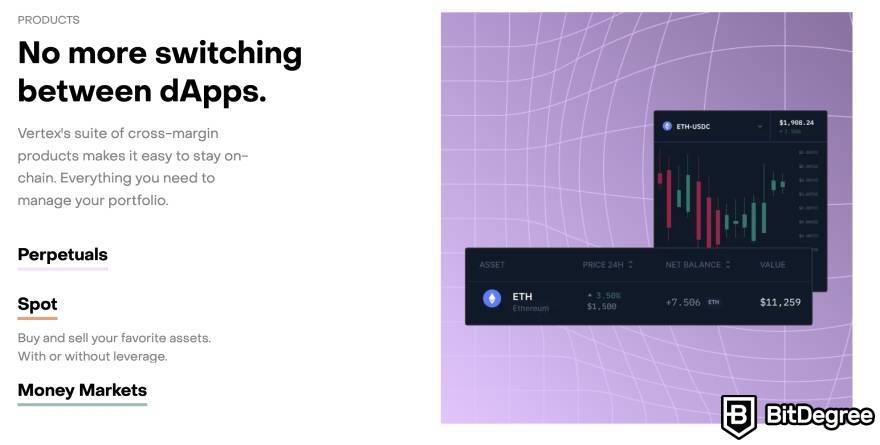
So - comparing and contrasting Vertex VS Uniswap, which one should you choose, and why? Note that, for this comparison, I’ll assume that, once Vertex launches to its full extent, it will have all of the features and functionalities that are currently promised to be implemented.
In a scenario like that, both Vertex and Uniswap become two very different platforms, even though they both offer decentralized crypto exchange functionality. Uniswap is less newbie-friendly, and is often favored among experienced traders. On the other hand, Vertex would provide you with an advanced-level dashboard, as well as CEX-like feature variety - something that is severely lacking with most other DEXs, Uniswap included!
That being said, it would really depend on what it is that you’re looking for. Uniswap might be decent when it comes to quick token swaps - if you’re not looking to trade cryptos, extensively, then this might be a viable option.
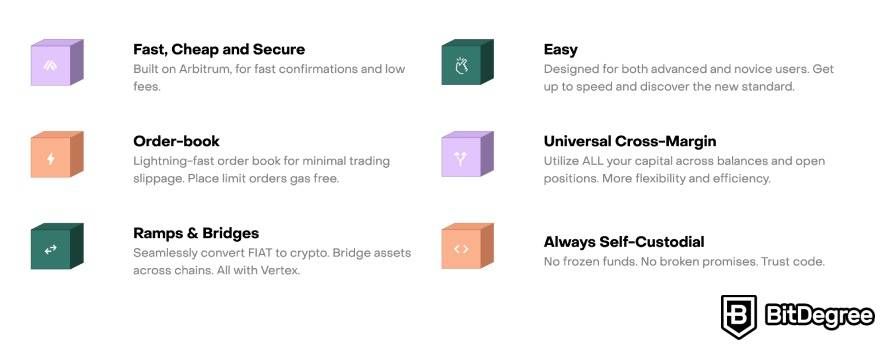
On the other hand, if you’re actually interested in long-term trading, and are looking for a unique solution to do so, learning how to use Vertex DEX is one of the best things that you could do! Not only will the exchange allow you to employ self-custody with your assets, but it will also provide you with CEX levels of functionality and user experience. There’s a lot of potential for the “best of both worlds” scenario here!
This becomes even more evident when you take a look at some of the most common complaints that Uniswap users have, regarding this particular DEX. For example, same as with most other decentralized exchange, Uniswap doesn’t have a fiat on-ramp - in other words, you won’t be able to purchase crypto with traditional currencies, such as EUR or USD, as you would on a centralized exchange.
Vertex addresses this problem, providing its users with the aforementioned on-ramp. This factor alone makes the DEX in question far more accessible to crypto industry newcomers!
Providing Testnet Feedback to Vertex
Up to this point in the article, we’ve discussed all of the main functionality of the DEX in question - in other words, you should now have a pretty good idea of how to use Vertex Protocol, both when it comes to trading, as well as navigating the platform, in general.
As I’ve told you earlier, while this tutorial has mostly focused on the testnet version of the exchange, there’s a pretty good chance that all of the major features will remain the same, when Vertex officially launches. Thus, even though you can currently only play around within the testnet, your experience with the platform will still be valuable, in the future.
Speaking of which, if you’re an active crypto enthusiast who loves to find new projects before they even launch, and have developed an interest in the Vertex testnet, you can actually help the team out, as well. This would be done in the form of submitting feedback, and offering any and all suggestions for improvements that you might have.
Feedback to Vertex can be submitted via HelloNext - here, you would simply choose to submit a bug report, or offer a feature suggestion, and submit your input. The great thing about this is that Vertex will go through all of the bug reports daily, and will react to all of them, accordingly.
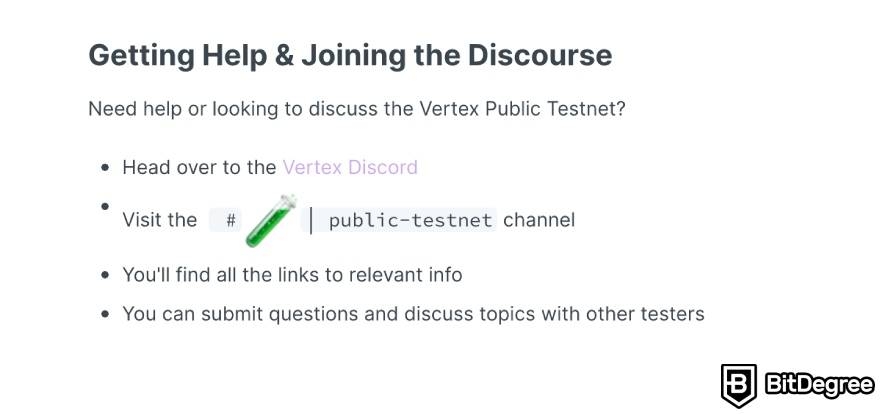
Alternatively (or, additionally), you may also choose to check out Vertex’s dedicated Discord server, as well. Here, you’ll find dedicated channels for discussing the public testnet, and will also be able to get your questions answered, if you were to have any.
| Basecamp | Trail | Peak | Summit |
| Rank 1 | Rank 2 | Rank 3 | Graduate |
Now, one of the more interesting incentives to learn how to use Vertex Protocol, as well as participate in the testnet and be active within the community, would be the Ambassador program available with the DEX, called “Everest”.
The program consists of 4 ranks, in total - each rank represents your input when it comes to spreading the news about Vertex, and contributing to making the exchange more popular and widely-known.
Each rank will have some rewards associated with it. When you “reach the Summit” (or, reach the final rank - Graduate), you’ll have the opportunity to become an official employee of Vertex, or perhaps even receive financial compensation for certain contributions that you’ve made. Graduates will also take care of the most interesting community tasks, such as organizing real-world events.
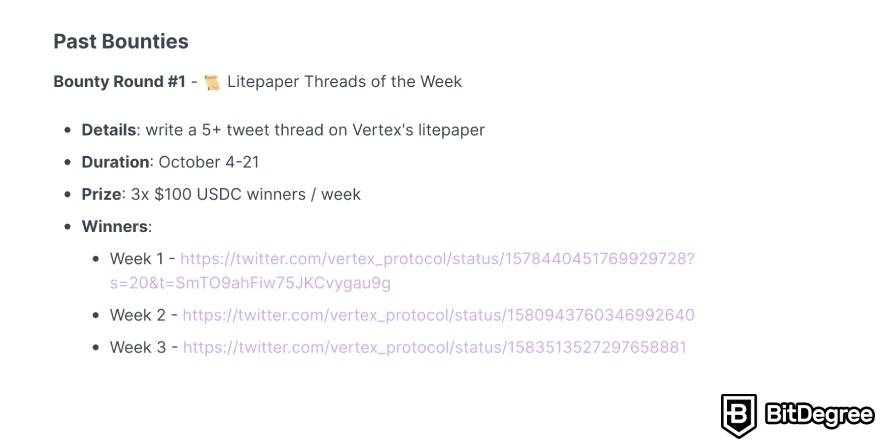
As a completely separate concept, you do also have Vertex content bounties - a special program that the platform employs in order to both boost its community engagement, as well as educate people about the services that it provides.
The way that this would work is quite simple - Vertex would announce a content creation competition, and lay out the rules. Then, the community would have the chance to win prizes, often in the form of cryptocurrencies.
As an example, the very first content bounty held by the platform had community members create Twitter threads, about the value that potential users would receive if they were to use Vertex, as their preferred DEX. The bounty for this competition came in the form of three 100 USDC prizes.
All of that is to say - participating in the public Vertex testnet, learning how to use Vertex DEX, and being active within the community can definitely be worth it, in some very objective ways!
Conclusions
So - that wraps up my guide on how to use Vertex Protocol, as far as the project’s testnet version is concerned! With the information that we’ve covered in the article, you should be able to try Vertex out for yourself, without feeling confused about how everything works.
Furthermore, we’ve also taken a look at Vertex VS Uniswap - the comparison that many people are probably going to make whilst trying out the former platform. Truth be told, with the value proposition that Vertex has, not only does it improve on a lot of major aspects of other DEXs, but it also acts as a standalone project, in and of itself - one that combines the most important features of both DEXs, as well as centralized exchange platforms.
Do keep in mind that, if you’d like to learn more about Vertex, I have a dedicated review written about the project - check it out! With that being said, though, thanks for reading through my guide on how to use Vertex DEX, and best of luck with your crypto adventures to come!
The content published on this website is not aimed to give any kind of financial, investment, trading, or any other form of advice. BitDegree.org does not endorse or suggest you to buy, sell or hold any kind of cryptocurrency. Before making financial investment decisions, do consult your financial advisor.

