Stop overpaying - start transferring money with Ogvio. Join the waitlist & grab early Rewards NOW! 🎁
Finding a reliable cryptocurrency wallet nowadays has become both much easier than it was, say, a few years ago, and also quite a bit more challenging, at the same time. You see, while there’s a huge selection of wallets to pick from, these days, the overwhelming number of features can get really confusing. In this tutorial, though, we’ll take a look at what is Ambire Wallet, and why it might be one of the better picks!
While Ambire isn’t a name that you might come across very frequently, the wallet is being mentioned among top crypto asset management apps, more and more often. A lot of crypto enthusiasts are coming across this product, for the very first time, and are trying to figure out - what is Ambire Wallet, and is it any good, to begin with?
Well, that’s what I’ll tell you about, in this tutorial! Specifically, we’ll talk about the main features of the wallet (what makes it an appealing project for crypto newbies and veterans, alike), and we’ll also cover the Ambire crypto wallet from the perspective of a beginner - in other words, check out all of the “how-to” questions that you might have with Ambire.
Let’s get to it!

Did you know?
Subscribe - We publish new crypto explainer videos every week!
ICO vs IDO vs IEO: Which One's the Best? (Easily Explained)


Table of Contents
What is Ambire Wallet?
To start things off, before we can get to discussing how to use the Ambire crypto wallet, the very first thing that we should do is answer the simple question - what is Ambire Wallet, in general?
Latest Ledger Flex Coupon Found:Well, as you might have gathered already, Ambire is a “smart” cryptocurrency wallet. Specifically, you’ll be able to use the wallet on your internet browser - no need to install it as a browser extension, though, since the Ambire Wallet app is website-based.
Now, it’s no secret that there has been a huge influx of hot crypto wallets to the industry - how is Ambire any different from its competition? Truth be told, the wallet in question really does have a lot to offer, feature variety-wise!
For starters, as you could expect, Ambire supports multiple different networks - meaning, it’s not a single-blockchain-specific wallet. Using Ambire, you’ll be able to store tokens from Ethereum, Polygon, Binance Smart Chain, and 8 other major networks.

This is a huge benefit for those who want to keep all of their crypto assets in a single place, and not worry about managing multiple different wallets. With that being said, though, this does bring us to another great feature of the Ambire Wallet app - the fact that it has hardware wallet support.
Three of the most popular hardware crypto wallet brands, to be a bit more specific - Ledger, Trezor, and Grid+ Latice. If you own a wallet from either of these brands - say, a Ledger Nano X, or a Trezor Model T -, you’ll be able to utilize Ambire as your interface, while still being able to enjoy the advanced security of your hardware wallet. How cool is that!
Now, naturally, these days, no high-end crypto wallet would be able to maintain its reputation as such without offering at least some sort of DeFi support. Following that, you can expect to be able to access decentralized finance-related features on Ambire, as well!

Whether it be Ambire Wallet airdrops, earning passive yield, or crypto lending, you’ll be able to access all of the most sought-after DeFi features, straight from the comfort of the Ambire Wallet interface. No need to venture off to third-party websites or platforms!
One last point to mention, as far as this “what is Ambire Wallet?” explanation is concerned, is the fee model associated with the wallet, and the DeFi-related transactions happening within. All of your gas fees will be managed automatically, and you’ll be able to pay for those fees with your stablecoins, instead of, say, ERC-20 tokens.
It’s definitely a very innovative approach to transaction fees, from a cryptocurrency wallet perspective!
By now, you should have a pretty good idea of what is Ambire Wallet, and what are its main “selling points”, if you will. Of course, we’ve only just scratched the surface, with this quick overview - I might write a dedicated Ambire review at some point in time, so keep an eye out for that, if it interests you!
For now, however, let’s move on and take a look at the Ambire Wallet token, features, and general functionality.
How to Use Ambire: Setting the Scene
For the sake of keeping things concise and orderly, I’ll assume that you have never used the Ambire crypto wallet before. We’ll start off from the registration on the wallet’s website, and make our way on from there.
If this *is* your first time with Ambire, worry not - we’ll take it step-by-step, and if there are any interesting features or points that you need to know about along the way, we’ll discuss them, as well.
How to Register on Ambire?
As mentioned earlier, first, let’s register on the site, in order to start using the Ambire Wallet app.
Step 1: Go to the Ambire official website. You can do so by clicking here. Always make sure that you’re using the actual, legitimate website, since there might be scammers and hackers trying to trick you into signing up on a fake site - bookmark the real one, and don’t press any suspicious links!
Step 2: In the middle of the screen, you’ll see a big orange “GO TO WALLET” button. Click on it, and you’ll be redirected to a new page.

Step 3: Here, you can either create a new account, or add an already-existing one. The latter feature will be useful to those individuals who, say, want to acquire an Ambire Wallet airdrop, and are already using a MetaMask wallet, or a Ledger or Trezor device.
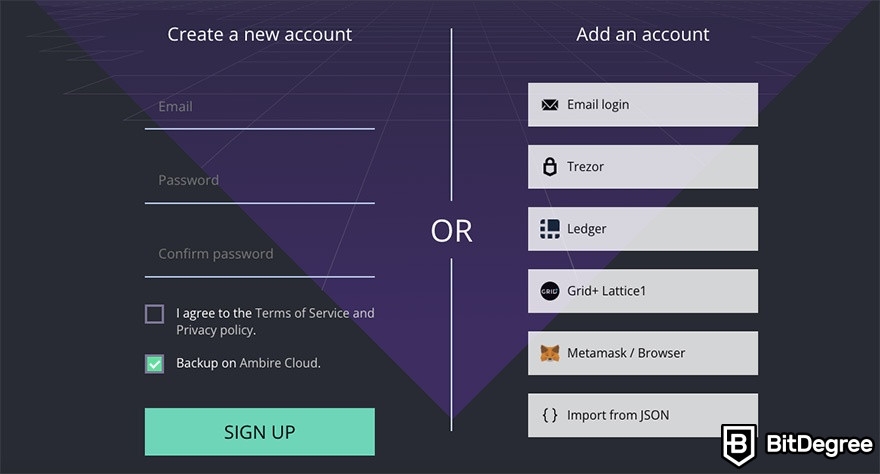
Since we’re assuming that this is your first cryptocurrency wallet experience, though, we’ll go ahead and create a completely new account. In order to do so, you’ll need to enter your email address, and create a password.
Step 4: Now, when you first log into your wallet, there’s going to be a barrage of messages and pop-ups. Don’t be alarmed, though - it’s all actually pretty simple!
First, you’ll need to verify your email address. You can do so by visiting your inbox, and clicking on the email sent to you by the Ambire crypto wallet. This is mandatory, and is needed in order for you to be able to recover your funds, in case you lose access to your wallet.

Then, you will also need to grant Ambire two browser permissions - specifically, you’ll need to allow the wallet to send you notifications, as well as to access your clipboard. While not all wallets ask for these things, it’s quite normal.

Lastly, before you’re allowed to finally access your wallet, you will also need to download your account backup. This will be used in case you forget your password.
After you confirm all of those things, that’s it - you’re in!
The registration process, in general, isn’t anything special or out of the ordinary, in a good way. Meaning, you won’t need any special knowledge in order to start using the Ambire Wallet app - what you’ll learn in this “what is Ambire Wallet?” tutorial will more than suffice!
Exploring Ambire: How to Send / Receive Crypto?
So - you’ve accessed your Ambire crypto wallet for the first time, and have the dashboard in front of you. The logical first thing to do is to figure out what all of what you see means, and where you can find all of the core features of the wallet!
Starting from the left side panel, this is where you’ll find all of the main sections of your wallet. The general dashboard, transferring and swapping sections, cross-chain functionality, your transactions, DeFi, and more. It’s here that you’ll be able to navigate between your activities, and the actual Ambire Wallet app itself.
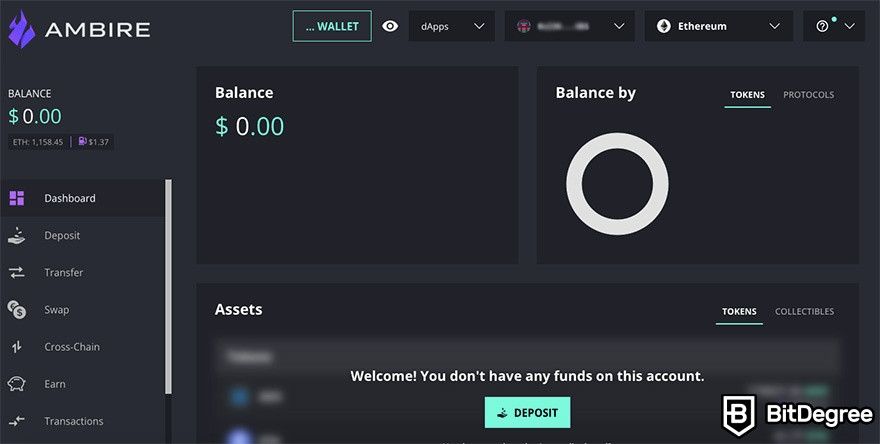
At the top of the page, you can connect to different dApps, view and copy your wallet address (as well as add other accounts), and change the network. Notably, this is super-simple to do, which is definitely hugely appreciated, granted the complexity of this process with some other wallets.
Depending on the section of the wallet that you’re visiting, the center of the page will look different. For now, though, let’s stay here, and perform our first notable action on the wallet, and in this “What is Ambire Wallet?” tutorial - fund your account!
Step 1: In order to deposit some cryptocurrencies into your Ambire Wallet, you’ll need to click on the “Deposit” button at the bottom of the page, or on the left side panel. This will bring up a menu with quite a few different choices. It’s probably a good time to talk about the anonymity aspect of Ambire.
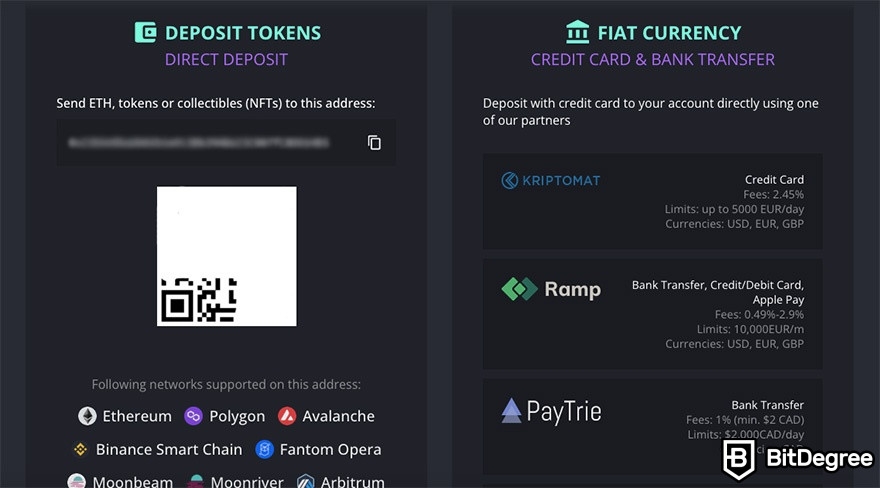
You see, Ambire is a non-custodial wallet. What this means is that you’re the only one who’s going to have access to your funds - the people behind the wallet will not. Following that, you can also use the wallet anonymously - apart from an email address, the platform doesn’t collect any other information about you.
That being said, as you can see from the right side of the above-presented screenshot, there’s an option to purchase crypto with fiat money. So… How does that tie into the whole anonymity spiel?
Well, simple - while the Ambire crypto wallet doesn’t track your identity, if you choose to purchase crypto with fiat money, you’ll need to pass KYC checks of the platform that you’re buying that crypto from - in other words, one of the Ambire partners. This has nothing to do with Ambire themselves.
Alternatively, you could deposit cryptocurrencies from another wallet that you might have, into Ambire. Figuring out what is Ambire Wallet, you might conclude that this is the more anonymity-preserving method to go about it, too! Let’s stick to it.
Step 2: You will need to go to your other crypto wallet (either a designated wallet, or an exchange account where you keep your crypto), and select the “withdraw crypto” option there. When prompted to enter your receiving wallet address, simply copy and paste the address of your Ambire Wallet app, or scan the QR code.
Step 3: After you’ve sent your funds, it shouldn’t take longer than a couple of minutes to receive them in Ambire (that’s usually the case, at least). When that happens, you’ll receive a browser notification, and will be able to see the received funds on your dashboard!

Step 4: Now, when it comes to the sending part of this “What is Ambire Wallet?” tutorial, things aren’t any more difficult, either. To start off, click “Transfer” on the left side panel, and you’ll be taken to a separate crypto sending page.

Step 5: Here, you simply need to pick the asset that you’d like to transfer, enter the amount, and the wallet address which you’re transferring the crypto to. After that, and a couple of confirmations, your funds will be sent!
Truth be told, sending and receiving crypto with Ambire is one of the smoothest and most self-explanatory processes! The entire procedure is fleshed out very well, and there are no confusing buttons or interfaces to navigate through, in order to either send or receive crypto assets. This is a huge point worth considering, especially if you’re only now figuring out what is Ambire Wallet.
Another point to take note of is the fact that your wallet address is pretty universal. Meaning, whether you’re looking for Ambire Wallet airdrops, NFT storage, or even different network support, all of these things will be supported by the same wallet address.
In other words, you could send ETH, BSC tokens, AVAX tokens, and a variety of other crypto assets to the same address - your Ambire Wallet app should receive them, and fund your account, no problem. At least that’s what the company themselves state.
Swaps & Cross-Chain Transactions
Sending and receiving crypto are the very fundamental features of a cryptocurrency wallet - that’s pretty clear, no matter if you’re reading a tutorial on what is Ambire Wallet, or else.
That being said, as we’ve established at the beginning of this article, Ambire does have a variety of additional features, too! So, now, let’s take a look at those features, and see how you could utilize them to improve your crypto experience. We’ll start off with crypto swaps, and cross-chain transfers.
Swapping, as the name might imply, allows you to swap your existing cryptocurrencies (that you have in your Ambire Wallet account) for other crypto tokens. In the example below, you can see a swap being performed, from ETH to WALLET tokens.
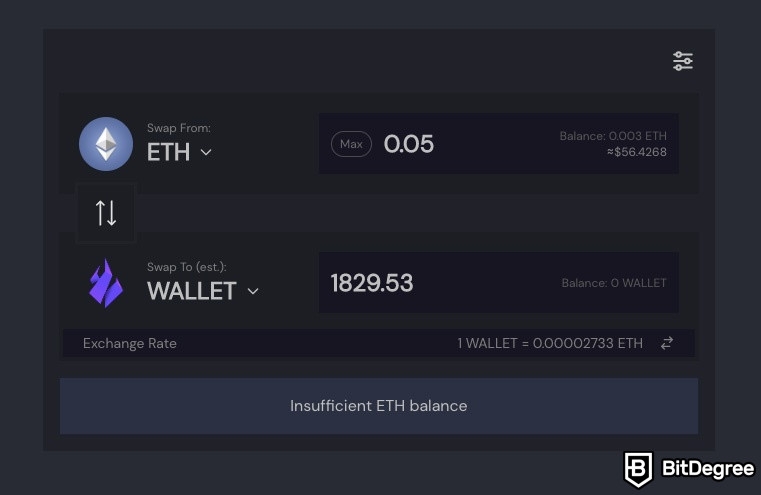
WALLET is the native Ambire Wallet token - in other words, it’s the native token of the project. It’s something that requires an entirely different article of its own (perhaps that dedicated Ambire review that I’ve mentioned earlier?), but these are also tokens that you can receive for supporting Ambire, too.
Getting back to the swapping functionality, you may choose your preferred token (the one that you’ll receive) from an absolutely-huge list of assets. Even if you’re planning on diversifying your portfolio with some very niche crypto coins and tokens, you should be able to do so with Ambire, no-sweat.
The cross-chain functionality is another huge feature that everyone who’s trying to figure out what is Ambire Wallet should be aware of. While the concept might seem confusing, if you’re just starting out, the premise is quite simple - Ambire allows you to swap the tokens or coins that you might have on one network, for the same assets on another blockchain.
Think about it this way - if you have Ether coins, on the Ethereum blockchain, you can swap them to the Binance Smart Chain. This cross-chain functionality is needed simply due to the fact that you can’t send your ETH to a BSC contract, without swapping it to the BSC network. Of course, this is just an example, but the premise is the same with other networks, too.
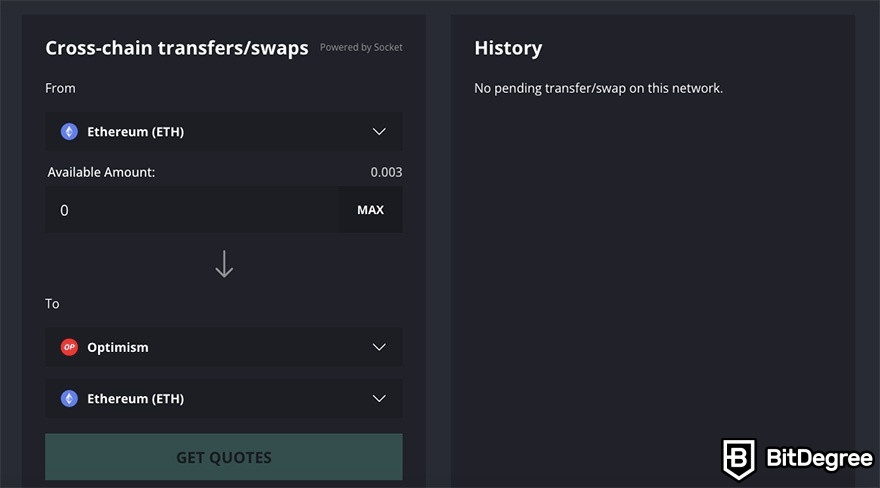
Even here, Ambire has managed to simplify the entire process, significantly. All that you need to do is pick a token from your wallet, and then choose the network that you’d like to transfer that token to. If your balance is sufficient, and you meet the transaction criteria, the cross-chain swap will happen, and you’ll receive your brand new tokens, on the other network!
One thing that makes Ambire stand out from the crowd here is, once again, the straightforwardness of these processes. Depending on your prior experience with cryptocurrency wallets, you might be aware of the fact that, with many wallets, things such as cross-chain swaps don’t exist, in general, or are much harder to navigate through.
Naturally, the fact that Ambire is a browser wallet (as opposed to a browser extension) helps the product in this regard, too. Ambire is able to provide its users with a modern and sleek user interface, which will then allow you to access all of the wallet’s main features in a super-quick and seamless manner.

- User-friendly design
- Robust security
- Long battery life

- Dual auditable Secure Element chips
- Quantum-resistant protection
- Water and dust resistant

- Transaction Check feature
- Direct dApps connection
- Great middle-ground price
Earning With Ambire
The last big feature that we need to talk about, when it comes to this “what is Ambire?” tutorial, is the earning functionality available on the wallet in question.
Indeed - with Ambire, you are able to earn a passive interest (also known as an APY) on your crypto, simply by depositing it into a smart contract. Note, however, that not all cryptocurrencies can be earned this way - in fact, the list is pretty limited!
Let’s get to the specific, though.
Step 1: In order to start earning on Ambire, you will need to swap your current cryptocurrencies (or some portion of your crypto portfolio) for one of the supported tokens. I’ll tell you about those tokens in a second, but just keep in mind that you can perform the swap from inside of the wallet, just like we’ve discussed earlier in the “what is Ambire?” article.
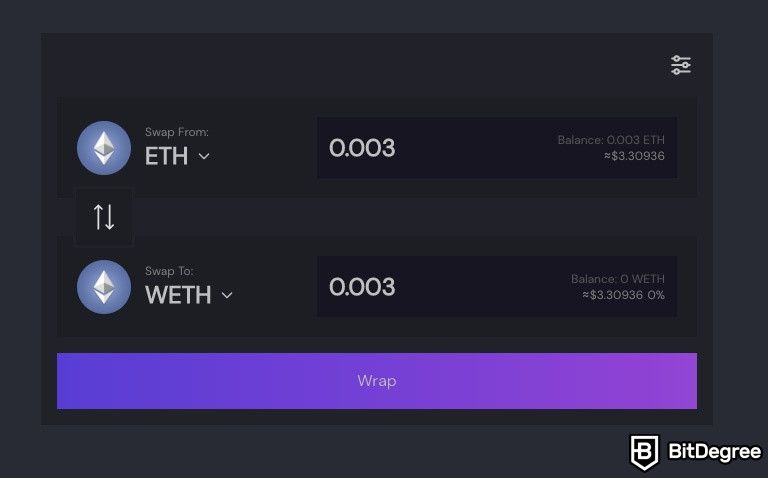
Step 2: Now, there are two Web 3.0 “channels” that you can utilize, in order to start earning with Ambire. One of them is Ambire itself - on it, you can stake either your Ambire Wallet tokens ($WALLET), or ADX tokens, and earn an APY of up to 40%.
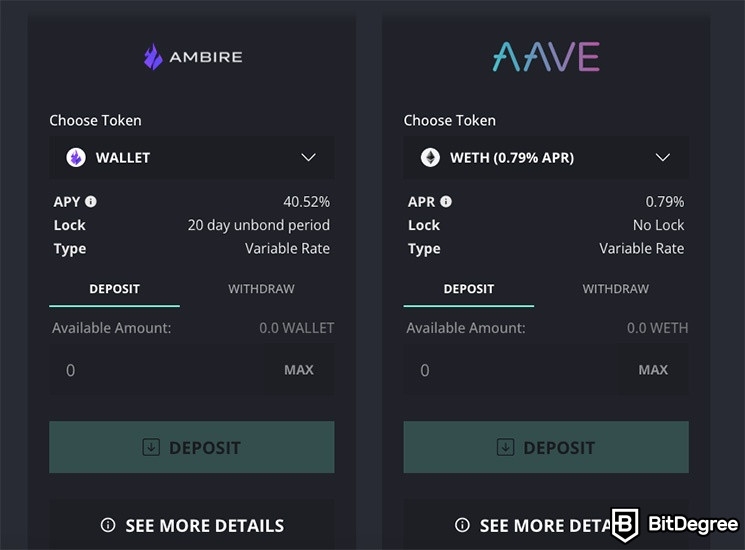
Following that, you may also utilize the built-in AAVE staking feature, which comes with a bigger list of supported tokens - namely, you’ll be able to stake WETH, WBTC, USDC, USDT, DAI, AAVE, and BUSD. If you choose to go the AAVE route, your APY could reach 1,47%.
Note, though, that the numbers mentioned above are provided by Ambire itself, and are subject to change at any point in time.
Step 3: Once you’ve decided on the token that you’d like to stake, all that’s left to do is to deposit it into the smart contract - congratulations, you’re now earning a passive interest on your crypto!
While the selection of available “Earn” channels isn’t all that broad, it should still be sufficient for most crypto enthusiasts out there, who are planning to use Ambire. On top of that, once again, when it comes to the functionality of this feature, the team behind the wallet has managed to create a smooth and confusion-free experience - definitely a noteworthy point!
Also, do keep in mind that you can even connect to dApps that are outside of Ambire, as well. This is possible to do thanks to WalletConnect.
Closing Thoughts
So - by this point in the “what is Ambire Wallet?” tutorial, you should have already formed a pretty good idea of what the wallet is all about, and what are the features that you can expect to come across, whilst using it.
How does Ambire shape up when compared to some other wallets in the crypto space, though? Is it a project that’s worth checking out, in the first place?
Well, to answer the latter question first, yes - Ambire is definitely a cryptocurrency wallet that deserves the attention of anyone who’s looking for modern, stylish, and browser-powered crypto asset management. The platform has all of the core features that you would expect to find in a high-profile cryptocurrency wallet, and then some.
To top that off, even when it comes to the argument that hot wallets aren’t as safe as cold (hardware) ones, Ambire has an answer to this problem, as well. The fact that you are able to connect the wallet in question to one of the Ledger or Trezor devices means that you’ll receive all of that hardware wallet-level security, but will still be able to utilize Ambire’s functionality, nonetheless.

This single fact alone puts the Ambire Wallet app ahead of many other hot crypto wallets out there! Even when you discard the aspect of asset security (which, to be fair, you should never do!), Ambire can still definitely compete with many of the top-tier wallets on the market!
The wallet is very convenient to use, supports multi-chain integrations, and allows you to swap networks in a blink of an eye. So, in short, yes - if you’re looking for an interesting hot wallet project, Ambire should definitely be on your radar.
Having said that, though, as I’ve pointed out a few times in this article already, this isn’t really an Ambire review - instead, this was a 'tutorial-introduction' to what is Ambire Wallet, and how to use all of the core features of the platform. The aspects discussed above would be better-explained in a dedicated review - once again, keep an eye out for that!
Conclusions
Whether you came to this article because you’re interested in Ambire Wallet airdrops, or you’re new to the crypto industry, and are looking for your first wallet, there’s one point that has been prevalent throughout the entirety of the tutorial - simplicity.
Ambire takes difficult DeFi and Web 3.0 concepts (such as staking, APY earning, and cross-chain swaps), and presents them to the user in a newbie-friendly and understandable fashion. It goes without saying that the same can be applied to the fundamental features of the wallet, too - things such as asset deposits and withdrawals, crypto acquisition, and so on.
If you’ve read this “what is Ambire?” tutorial, and have decided to try the wallet out, great! However, do make sure that you’re utilizing all of the available tools in order to keep your assets safe. Since Ambire is compatible with some of the best hardware cryptocurrency wallets in the industry, check out Ledger Nano X and Trezor Model T - both of these wallets will take your crypto safety to another level!
On top of that, if acquiring crypto via a wallet isn’t your cup of tea, you may also check out our dedicated list of the best cryptocurrency exchange platforms - just keep in mind that, if you’re not an active trader, it’s recommended that you store your crypto in a safe, dedicated wallet, after you purchase it!
Thank you for reading, and I wish you the best of luck with Ambire, and all of your cryptocurrency adventures still to come!
The content published on this website is not aimed to give any kind of financial, investment, trading, or any other form of advice. BitDegree.org does not endorse or suggest you to buy, sell or hold any kind of cryptocurrency. Before making financial investment decisions, do consult your financial advisor.


