Free Airdrop Season 7 is LIVE! Answer fun questions or do simple tasks to earn rewards from the $30K BitDegree prize pool. Participate Now ! 🔥
Welcome to this guide all about building a mining rig. If you’ve ever wondered just how to put together your own Ethereum mining rig, you’re in the right place!
In this guide, I’ll be teaching you everything you need to know about building your very first GPU mining rig. I’ll cover briefly what we mean when we talk about mining Ethereum and why you would even want to do it.
By the end of this Ethereum mining rig guide, you should have all the knowledge you need to build your mining rig and get started mining Ethereum.
Also, if you're interested in the easiest way to buy Ethereum, you should consider the most popular cryptocurrency exchanges, such as Binance, KuCoin, Coinbase, and Coinmama.

|

|
|
|---|---|---|
| Advanced Users & Beginners | Best for Buying & Selling Crypto with Small Fees | |
| Turkey, Argentina, Vietnam, Ukraine, + 180 more | United Kingdom, India, Russia, Mexico, + 150 more | |
| See All Coupons of Best Exchanges | See All Coupons of Best Exchanges | |
| One of the leading crypto exchange platforms in the industry. | A reliable and well-established cryptocurrency exchange platform. | |
|
See TOP10 Brands
Read review |
See TOP10 Brands
Read review |
Table: A comparison of Binance and KuCoin general features
As always, there are loads to cover in this guide to building a mining rig. With that in mind, let’s begin. We’ve already wasted enough time!
(If you’re already familiar with the concept of Ethereum mining, feel free to skip to the ‘what is an Ethereum mining rig’ section).

Did you know?
Subscribe - We publish new crypto explainer videos every week!
What is Terra Luna? History & Crash Explained (ANIMATED)


Table of Contents
- 1. What is Ethereum Mining?
- 1.1. Block Rewards and Mining Fees
- 2. What is an Ethereum Mining Rig?
- 3. What You Will Need to Build an Ethereum Mining Rig
- 3.1. Ethereum Mining Hardware
- 3.2. Ethereum Mining Software
- 3.3. Mining Rig Equipment
- 4. How to Build Your Mining Rig
- 4.1. Building the Computer Itself
- 4.2. Adding the Power Supply Unit
- 4.3. Adding the GPUs
- 4.4. Taking Care of the Software
- 5. Powering Up Your GPU Mining Rig
- 5.1. Making it all Look Good!
- 5.2. Use Coloured Aluminium Lengths
- 5.3. Close the Mining Rig Frame and Decorate it
- 5.4. Experiment with Different Ways to Hang Your GPUs
- 5.5. Adding Lights
- 5.6. Add a Monitor to the Unit
- 6. Conclusion
What is Ethereum Mining?
Before I get started teaching you how to build a mining rig, it’s important to understand what we mean when we talk about Ethereum mining.
Latest Deal Active Right Now:Head to BitDegree Missions, gather as many Bits as possible & claim your stake of the $30,000 Prize Pool! Don't waste your time & start collecting Bits by completing Missions and referring friends.
Ethereum is the network behind the blockchain-based cryptocurrency Ether. A blockchain is like a bank’s record of transactions. Of course, you need to trust your bank to keep this record of transactions accurate and up-to-date. With cryptocurrency, you don’t need to trust a single entity. You simply trust the open-source, peer-reviewed code. It’s not a coincidence that the first blockchain-based digital currency was created just after the 2008 financial crisis!
To ensure that no one cheats the system and that everyone only spends their Ether coins once, specialized computer systems secure the network. These systems are known as miners. When you broadcast a transaction to the Ethereum network, the miners check that the rules of the network are followed and that the sending address has the necessary number of ETH coins to make the transaction.
The miners then group transactions into blocks. To add a new block to the network, miners must guess a string of characters that is unique to the block. This string of characters is known as the block’s “hash”. Each block contains the hash of the previous block, as well as the new hash that needs to be guessed by the miners. By including the previous block’s hash, the miners can check that the transaction contained in a specific block did indeed come after those that supposedly went before it. This sequence (or chain) of blocks is known as the blockchain.
Once one of the network’s miners guesses the hash of the block they are trying to add, it is added to the blockchain. This process of guessing is called “proof-of-work”. It’s the single most important security feature of blockchain-based cryptocurrencies. Want to know more? Read my Ethereum mining guide here.
Block Rewards and Mining Fees
So, why would you want to mine Ethereum anyway? Surely everyone doesn’t spend all that money on electricity and computer systems to secure the network out of the goodness of their heart!?
The answer is a simple one. It’s all about money.
You see, when a miner gets to add a block to the blockchain, they pick up what’s known as a block reward. They also get to keep all the fees that were included with the transactions that they added to the blockchain. The promise of ETH coins every time you get to add a new block to the chain creates a powerful financial incentive for miners to mine on the Ethereum blockchain.
What is an Ethereum Mining Rig?
You can mine Ethereum on a regular gaming computer. However, to make it as efficient as possible, you can build a unit that’s the only purpose is to mine Ethereum. This takes a bit of time and isn’t particularly cheap. It does mean that you are mining Ethereum much more efficiently than if you were just using a standard computer system though.
An Ethereum mining rig (as these purpose-built units are called) are all-in-one computer systems that have been designed and built to mine Ethereum (or other cryptocurrencies).
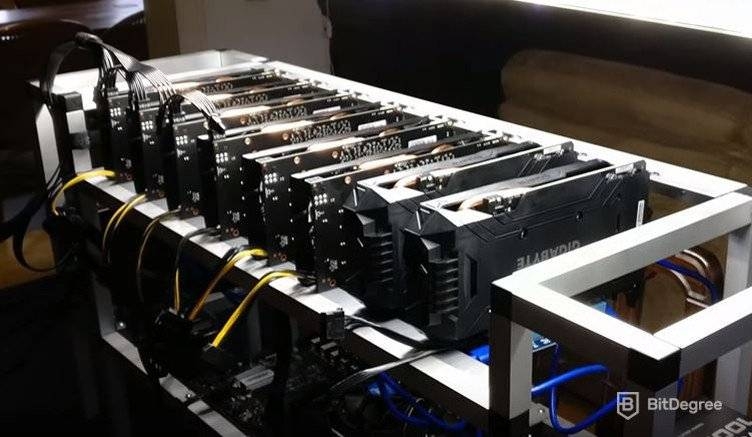
8 GPU GTX 1060 Ethereum Mining Rig | Source: unitexmart
The most important components of an Ethereum mining rig are the power supply unit and the GPUs themselves. GPU stands for the graphics processing unit. They’re what gives high-end gaming computers the capability of running the spectacular graphics of modern PC games. They’re also great for making many guesses at the hashes of Ethereum blocks in as short a time as possible.
Ethereum mining rigs usually have at least two of these GPUs. However, they can house many more. How many you decide to go for will depend on your budget for building your mining rig. Of course, the more GPUs you have, the larger (and more expensive) the power supply needs to be. On top of this, you will need many more additional components to make the whole thing work.
What You Will Need to Build an Ethereum Mining Rig
Before I get started explaining how to build a mining rig, I’ll show you everything you will need. The equipment will vary slightly depending on the components you will be using.
To build your first Ethereum mining rig, you will need:

Ethereum mining hardware.

Ethereum mining software.

Materials to
build the rig.
Ethereum Mining Hardware
There are lots of different GPUs that you can choose from when putting together your own Ethereum mining rig. The most popular manufacturers are AMD and NVIDIA.
Any GPU will work to mine Ethereum. However, I particularly recommend one of the following pieces of hardware for your rig:
- NVIDIA GeForce GTX1070.
- AMD Radeon RX580.
- NVIDIA GeForce GTX1060.
- AMD Radeon RX Vega 56.
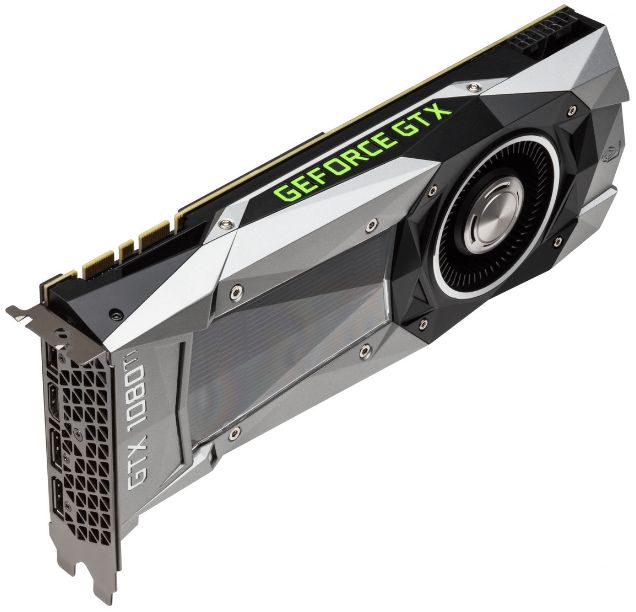
- NVIDIA GeForce GTX1080 Ti.
- NVIDIA GeForce GTX1070 Ti.
Ethereum Mining Software
As the choices for mining hardware, there is no shortage of software options to mine Ethereum on. This guide isn’t really about picking the best mining software out there though, so I’ll keep it brief.
If you’re not sure what I mean when I say mining software, it’s a program that connects your Ethereum mining rig to the Ethereum network.
WARNING! Downloading mining software can be a dangerous game. There are many instances of malicious software being attached to mining software packages. Such programs could steal any Ether you’re able to unlock through mining. You have been warned!
Some of the best mining software for dedicated mining rigs are:
- EthOS
- Claymore
- Geth
Mining Rig Equipment
Before you get started building your Ethereum mining rig, check that you have all the components and tools below. The whole assembly process shouldn’t take more than an hour so if you can have everything you need before you begin building, you’ll be up and running in no time.
To build your Ethereum mining rig, you will need the following:
- Angled aluminum lengths (5x24”, 8x14”)
- Wooden blocks (3x 1”x1”)
- Power supply unit capable of driving all the components
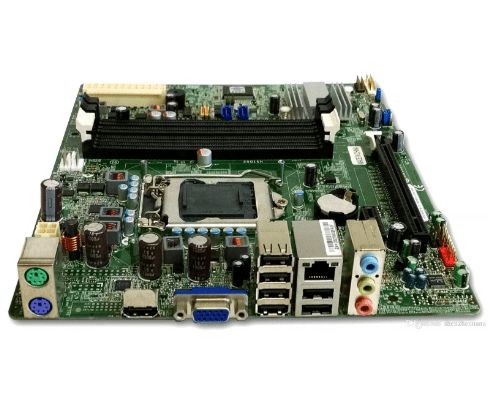
- Motherboard
- Power cables
- Random access memory (RAM)
- Central Processing Unit (CPU)
- Heatsink fan
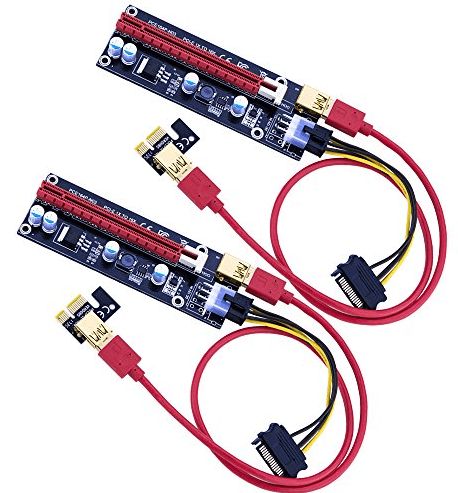
- Powered risers
- GPUs (more on these later)
- Power Drill
- Self-tapping screws
- Screwdriver
- Zip ties
- Power switch
- Blank USB stick
- Computer
- Computer monitor
- Ethernet cable
Also, keep in mind that once you mine Ethereum, you will need a reliable hardware wallet. It's recommended to go for Ledger Nano X or Trezor Model T.
CLAIM 10% DISCOUNT
On Best-selling Ledger Bundles!
For a limited time only, get Top-rated Ledger bundles for yourself and your loved ones with a 10% Ledger discount code. Take advantage of this valuable Ledger deal NOW!
How to Build Your Mining Rig
- First, you must screw the 14” angled aluminum together to create two squares. For this, you will use your drill and self-tapping screws.
- Next, you connect the two aluminum squares using the longer aluminum lengths. Again, use the drill and screws to make sure it’s all nice and solid. You should now have a steel frame that is a cuboid in shape.
- You now need to use the last longer aluminum length as a crossbar to hold your GPUs in place. This should be attached around 3-4” in from the edge of your mining rig frame.
- The next step is to add the wooden blocks to the bottom of the frame (on the opposite side that your crossbar is).
- Add three wooden blocks using your motherboard as a guide to where you need to place the blocks.
- You need the mother board to fit neatly inside the frame so add one block close to the edge of the frame and a second where the opposite edge of the motherboard will sit. The third block should be placed in the middle of these.

Did you know?
Subscribe - We publish new crypto explainer videos every week!
What is a Bitcoin Faucet? Pros & Cons Explained (With Animations)


Building the Computer Itself
- Now that the frame is ready, you need to add the motherboard itself. This time use the screwdriver and self-tapping screws. This should stop you from damaging the motherboard when fixing it in place.
- You next need to add the CPU to the motherboard.
- Carefully take it out of the protective casing you bought it in and gently place it in the CPU housing on your motherboard. It’s important not to touch the motherboard or base of the CPU. Grease from your fingers could damage these sensitive components.
- Once the CPU is in place, lock it down with the cover on the motherboard.
- The next component to add is the heatsink for the CPU. Place this over the CPU and plug the 4-pin connector in that is next to the CPU itself.
- Following this, it’s time to add the RAM to the mining rig.
- Take the stick of RAM and place it in the relevant position on the motherboard. It should be fairly obvious where this goes. However, if it’s not, check the motherboard’s user manual. It might take a little bit of force to correctly click the RAM into place.
Adding the Power Supply Unit
- Now, you need to add your power supply unit.
- Place the power supply unit next to the motherboard in the frame. There should a 24-pin slot (main power input) and an 8-pin slot (for the CPU) on the motherboard.
- Use your power cables to connect the motherboard to the power supply unit.
- Next up is adding the powered risers. These are used to connect the motherboard to the GPUs.
- Since they’re powered risers, they also need connecting to the power supply unit. Use more power cables to connect these to the power supply unit.
- On your powered risers, there should be a USB cable that leads to a chip. These chips need to be plugged into the relevant position (PCI-E slots) on the motherboard. Again, use the manufacturer’s guide to find these if you’re not sure where they need adding.
Adding the GPUs
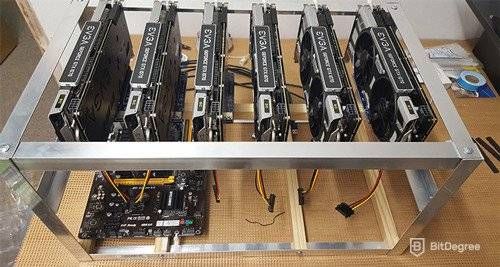
It’s now time to add the most important component of your cryptocurrency mining rig — the GPUs. You need to take each GPU and plug each of the powered risers into them. There will be a slot on each GPU that the riser fits neatly into.
 Source: wikimonks
Next, connect each GPU to the power supply unit. Use more power cables to do this. There should be some 8-pin cable holes towards the top of each GPU for your cables. Be careful to make sure all the cables go inside the framework or it’s going to look messy!
Following this, you must hang the GPUs in the frame. By now, your frame should look rather cluttered with components, so we want to add the GPUs in the space at the top of the frame. You can use the zip ties to hang your GPUs on the horizontal aluminum lengths at the top of the frame. You don’t want them too close together. Try to space them around 6” apart from one another.
The last component to add is the power switch. Plug the power switch into the motherboard.
Taking Care of the Software
On your computer download the Ethereum mining software you want to use and add it to your USB stick. For this example, we’re using ethOS.
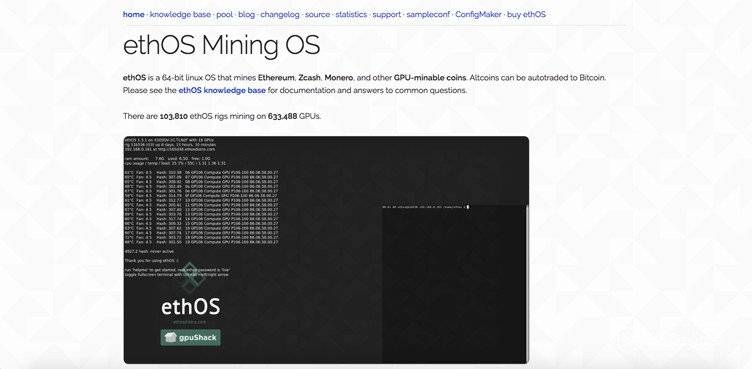
Plug the USB stick into the USB drive on the motherboard and plug the ethernet cable into the ethernet cable socket on the motherboard. Plug the other end into your internet’s router. Plug the monitor in and connect it to the mother board too.
You’re now ready to start it all up!
Powering Up Your GPU Mining Rig
Turn the power supply on and use your power switch to turn the motherboard on. If you connected everything correctly, the GPU fans should start to spin, and you should see the software start to run on the monitor. If you’re using ethOS, you need to type “show miner” and you should see a lot of text streaming up the screen. If you do, you’re mining Ether on the Ethereum already!
How long it takes to mine an Ethereum block will depend on the number and power of your GPU units. All you need to do now is sit back, relax, and wait for your money to roll in!
Making it all Look Good!
Unfortunately, the above guide is just the basics. Your mining rig will probably look pretty ugly at this point. You’re not going to want to invite all your tech-buddies around to show off your handywork just yet!
Thankfully, I’ve got a few tips and tricks that you can use to make your cryptocurrency mining rig look awesome!
Use Coloured Aluminium Lengths
Instead of using the industrial-looking natural aluminum lengths, you could invest a little more and get some fancy colored ones. Shop around and you’ll find some cool metallic finishes. Also, black angled aluminum lengths are pretty common – and of course, black goes with anything!
GPUs often have coloured on them and look pretty cool themselves. You could match the color of your framework to the color of the detailing on the GPU itself. For example, NVIDIA GPUs are often a funky lime green color and black. Using vertical lime green aluminum lengths and black horizontal pieces would certainly give your Ethereum mining rig a stylish finish!
Close the Mining Rig Frame and Decorate it
One option to make your mining rig look great is to add sheets of some material to enclose the entire unit. Be careful when doing this, however. In the above example, we designed our mining rig to be as functional as possible with as little work. If you decide to add sheets to enclose the unit, you are restricting airflow. This is important since running a GPU 24-hours a day will get very hot!
If you do want to enclose your cryptocurrency mining rig, make sure you add at least one fan to get rid of all that hot air. If you don’t your GPU units are much more likely to burn out quickly.
If you’re confident at adding fans to your rig, there are all kinds of cool materials you can use to enclose the unit. You could use the same or different colored aluminum if you don’t want to see inside the unit. Alternatively, you could go for some see-through or semi-see- through material such as Perspex.
You can then decorate the outside of the rig by using paints or by adding stickers of your favorite crypto projects. It won’t be hard to find all kinds of Ethereum stickers online to use on your GPU mining rig!
Experiment with Different Ways to Hang Your GPUs
In the above example, I used zip ties to hang the GPUs. This was to make it very quick and easy to replace GPUs if they burn out or you just want to upgrade them. Unfortunately, as convenient as zip ties are, they don’t look so cool!
If the appearance of your Ethereum mining rig is really important to you, you could use something a little more permanent.
You could try drilling a hole in the mining rig frame and attaching a bracket to hang the GPUs off. This will keep everything inside the frame itself and make the whole thing look that little bit more professional.
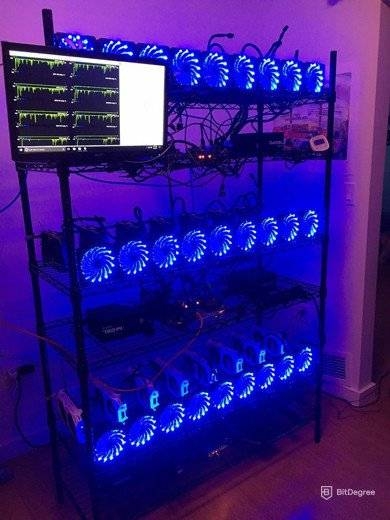
Adding Lights
If you’re not so concerned about the efficiency of your Ethereum mining rig, you could always use some of the extra power that your power supply can produce to add some fancy lights. You can go wild with lights. Just look at some custom high-end gaming PCs for inspiration. Although they won’t add any functionality to the unit, lights will make a mining rig looks like it’s from the not-too-distant future!
 Source: masterwork

- Secure and reliable
- Accepts fiat currencies
- Lots of trading options
- Reputable exchange
- Accepts fiat currencies
- Offers various trading options

- Fiat currencies - accepted
- Simple to use
- Accepts only the most trustworthy cryptocurrencies
- A leading cryptocurrency exchange platform
- Best for beginner investors
- Accepts fiat currencies

- Fully reserved and transparent
- Multiple tradable asset classes
- Over 300 supported cryptos
- Over 300 cryptocurrencies
- Secure & transparent
- Fully reserved
Add a Monitor to the Unit
Another way to make your Ethereum miner look great is to add a monitor to the unit itself. This will allow you to track your unit without needing extra wires or using your computer’s monitor.
You can mount a small LCD monitor to the framework and run it off the same power supply as your GPUs (if it’s a large enough power supply). You can then choose to encase the whole thing or leave it open. Adding a monitor to your GPU mining rig will not only make it look cool but it will also mean you can use it in a smaller area of your home or office!
Conclusion
So, that’s it! That’s my guide to building a mining rig. Although they might look super-high-tech, they’re not that hard to set up!
There are a few more things to mention before I finish up this guide though. First, you should shop around for the best price energy provider you can. You might think that the most expensive part of mining cryptocurrency is the price of the parts you use to build your mining rig. However, you’d be wrong! Electricity will seriously eat into your profits. Always go with the cheapest provider.
When it comes to making a profit, many people choose to trade Ethereum. If that's what you decide to do, then go for Binance, Coinbase, or KuCoin. These cryptocurrency exchanges are among the most reliable ones.
It’s also not worth buying second-hand GPUs for your mining rig. They might save you a little money upfront but they’re unlikely to run as efficiently as new ones and their life expectancy will be much lower!
Hopefully, with the tips I’ve given you in this guide, you’re now all set to start building your first Ethereum mining rig.
Now that we’re all done. What do you think? Will you be building your rig? We’d love you to post some pictures of your completed builds below!
The content published on this website is not aimed to give any kind of financial, investment, trading, or any other form of advice. BitDegree.org does not endorse or suggest you to buy, sell or hold any kind of cryptocurrency. Before making financial investment decisions, do consult your financial advisor.


